Fix Oval Circles in Embroidery: The Digitizing Solution
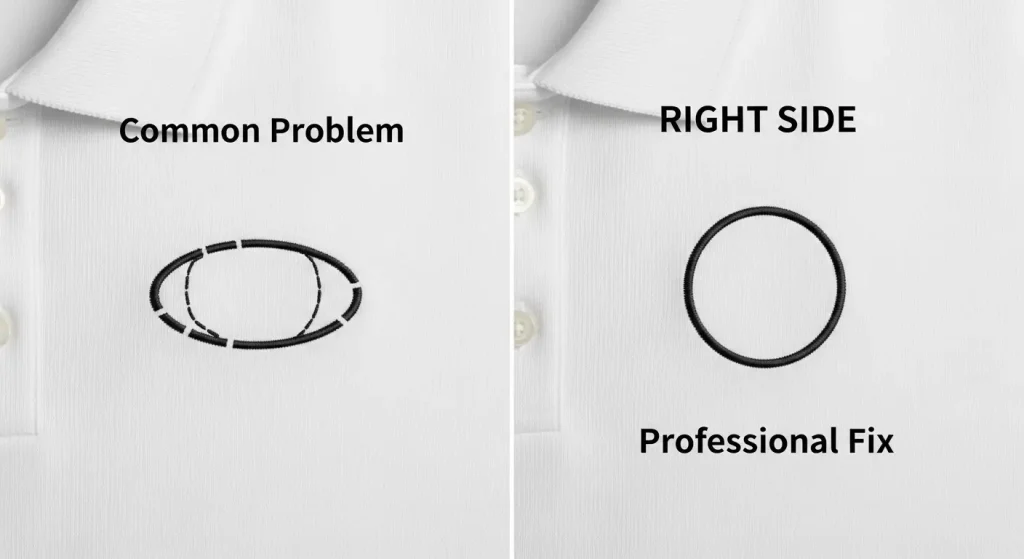
You’ve run the same circle design three times, and every single one comes out looking like an egg instead of a coin. There’s a noticeable gap where the circle should close, and the sides stretch outward instead of staying perfectly round.
This is one of the most frustrating issues in embroidery digitizing, and it happens more often than you’d think—especially with small logos, badges, and monograms. The good news? It’s not your machine. It’s the digitizing.
Let’s break down why this happens and how to fix it permanently.
Why Circles Turn Oval
A perfect circle in your design software does not automatically translate into a perfect circle when stitched. Embroidery machines pull fabric as the needle moves, and this pulling force distorts the shape—especially on curved objects.
Three main reasons circles fail:
- No pull compensation: The design doesn’t account for fabric tension during stitching.
- Wrong stitch direction: Linear stitches across a curve create gaps and distortion.
- Missing or weak underlay: Without a stable base, the fabric shifts under the needle.
If your digitizer didn’t adjust for these factors, the circle will always look oval, no matter how many times you re-run it.
The Digitizing Problem
Many beginner digitizers use auto-digitizing software that converts artwork into stitches without understanding the mechanics. These programs treat a circle like a square—they just fill it with straight lines.
Here’s what happens:
The software lays stitches horizontally or vertically across the circle. As the needle moves back and forth, it pulls the fabric inward along the stitch direction. The sides compress, the top and bottom stretch, and you’re left with an oval.
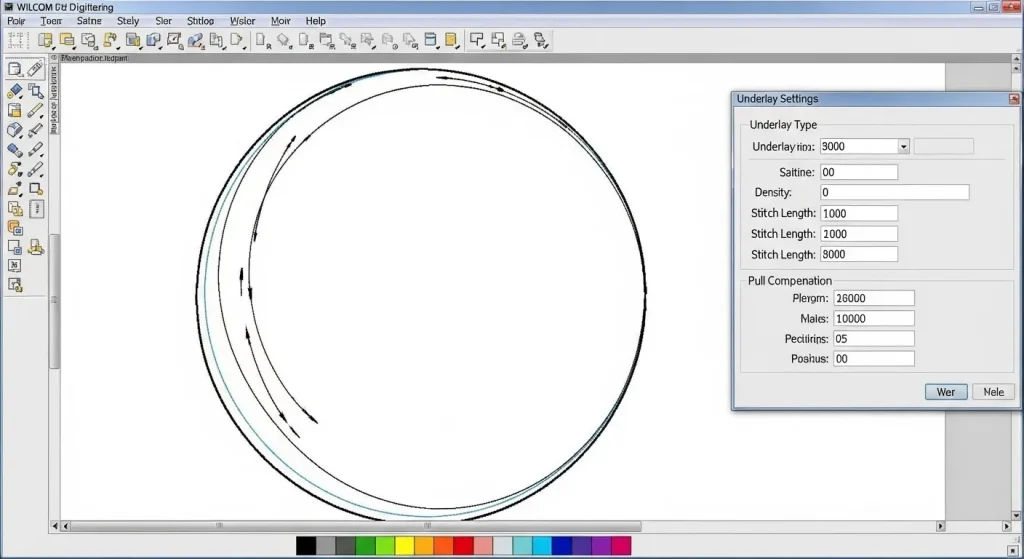
A professional digitizer using Wilcom software manually adjusts stitch angles, density, and underlay to maintain the shape under tension.
Note: If you’re struggling with consistent distortion across multiple designs, your files likely need professional rework. Auto-converted files rarely account for real-world stitching behavior.
How to Fix Oval Circles: Step-by-Step
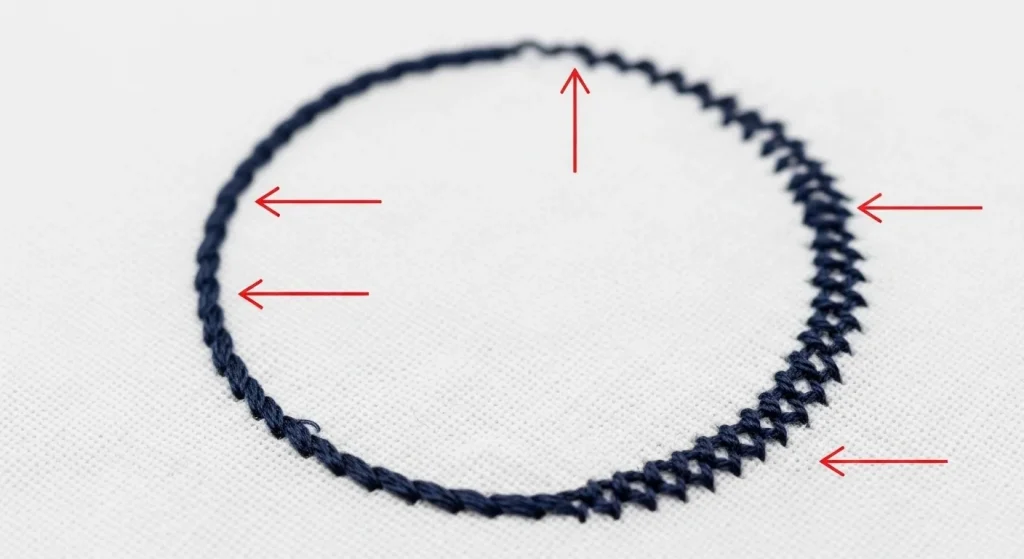
Step 1: Check the Start and End Points
The gap you’re seeing is usually caused by misaligned start and end points. In a well-digitized circle, the last stitch should overlap the first stitch by at least 2mm to create a seamless connection.
Quick Fix: Open the file in your digitizing software and manually move the start point so that the end overlaps it. Lock both points together.
Step 2: Add Proper Underlay

Underlay is the foundation of any stable embroidery. For circles, a center-out radial underlay works best. This means the underlay stitches radiate outward from the center of the circle, creating a firm base that resists distortion.
Without underlay, the fabric bunches and shifts as the top stitches pull—leading directly to that oval shape.
Step 3: Adjust Stitch Direction
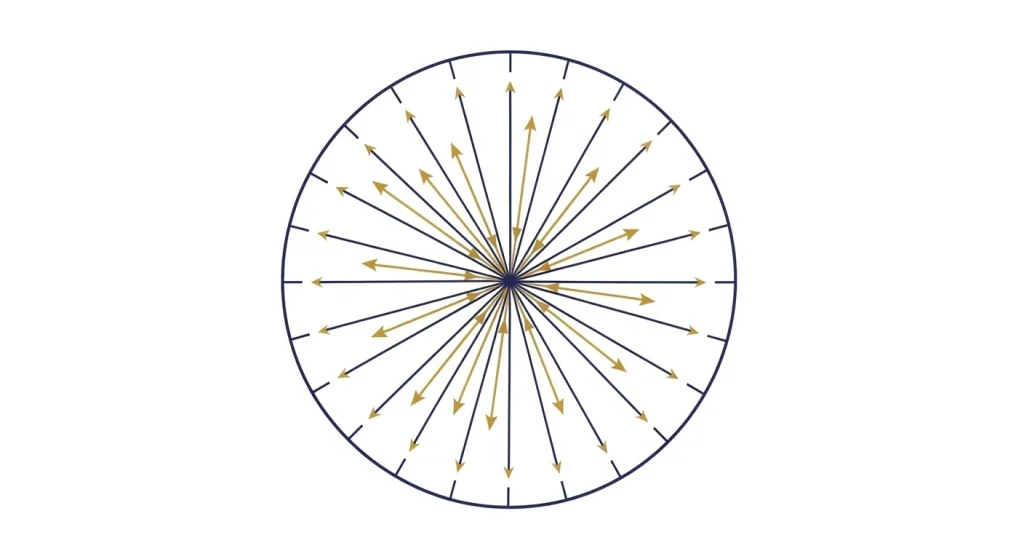
Circles need radial stitch direction, not linear. This means every stitch should flow from the center outward, following the natural curve of the circle.
Why this matters: Radial stitching distributes tension evenly around the shape. Linear stitching concentrates all the pull in one direction, warping the circle into an oval.
This is a manual adjustment. Auto-digitizing tools rarely get this right.
Step 4: Apply Pull Compensation
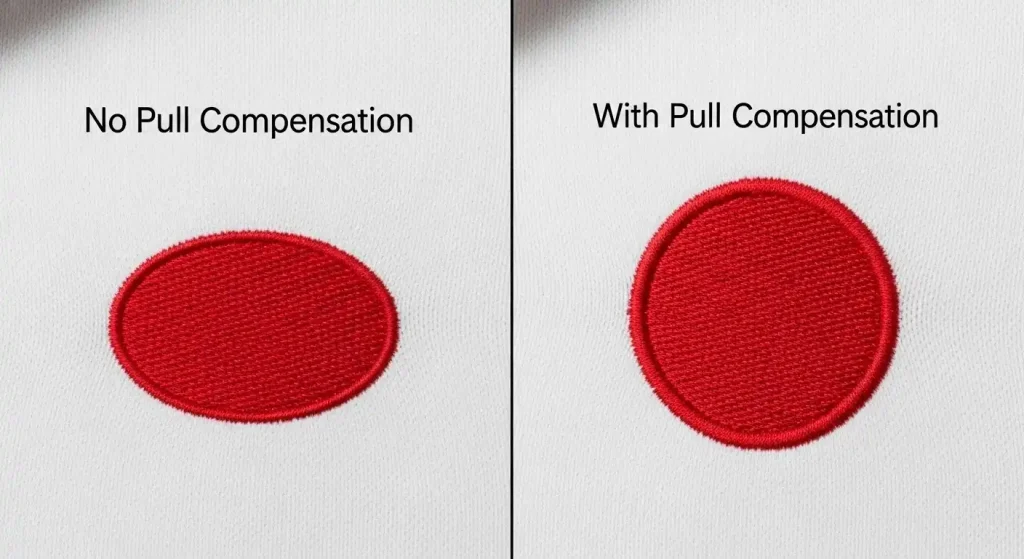
Pull compensation is a digitizing technique that slightly enlarges the design in the direction of the pull. Since embroidery compresses fabric along the stitch line, adding 5–10% width compensation keeps the circle round after stitching.
Pro Tip: Heavy fabrics like denim require more compensation than lightweight knits. The digitizer needs to know your fabric type to set this correctly.
Step 5: Test on Your Fabric
Even the best digitizing won’t work if it’s not tested. Run a sample stitch-out on the actual fabric you’ll be using. Adjust density, underlay, and compensation based on the results.
A circle that looks perfect on cotton might still distort on stretchy polyester or thick fleece.
Summary

Oval circles and gaps are digitizing problems, not machine problems. The fix requires proper underlay, radial stitch direction, pull compensation, and precise start/end point alignment.
If your designs keep coming out distorted, it’s time to have them professionally digitized. Whether you need custom patches, cap logos, or jacket designs, Sassy Digitizing ensures every shape holds its form under the needle.
About the Author
Keith Blair | Senior Quality Control (HOD)
Keith Blair serves as the Head of Department for Quality Control at Sassy Digitizing, bringing 12 years of commercial embroidery experience to the team. His role focuses on the technical mechanics of digitizing, specifically adjusting stitch densities and lengths to suit different fabric types.
A specialist in advanced production methods, Keith oversees the digitizing standards for complex 3D puff, appliqué, and small lettering projects. He ensures that every file is tested for efficiency and runnability before it reaches the customer, bridging the gap between digital design and physical production.


