If you have ever tried to embroider a logo onto a backpack and ended up with a wrinkled, puckered mess around the design, you already know how frustrating it can be. Spongy, padded backpack materials are one of the trickiest surfaces in the embroidery world, and the fix is not as simple as just tightening your hoop.
The good news? Puckering on spongy backpack material is a digitizing and setup problem not a machine problem. Fix those two things, and the puckering disappears. Let’s walk through exactly how to do that.
Why Spongy Backpack Material Causes Puckering
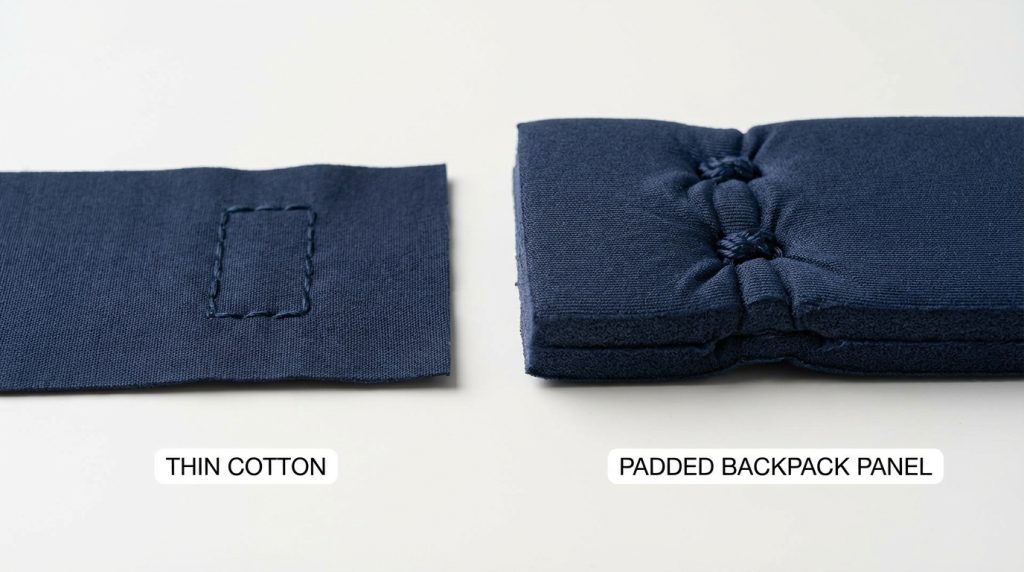
Backpack panels are not flat fabric. They have a padded, compressible foam layer underneath the outer shell. When your embroidery machine pushes the needle through this material repeatedly, the stitches pull the surface inward and compress the foam unevenly. This creates that rippled, puckered appearance around the design.
The higher your stitch density and the weaker your stabilizer, the worse the puckering becomes. Spongy materials also shift during hooping, which makes the problem even harder to control without the right setup.
Step 1: Use a Cut-Away Stabilizer Not Tear-Away
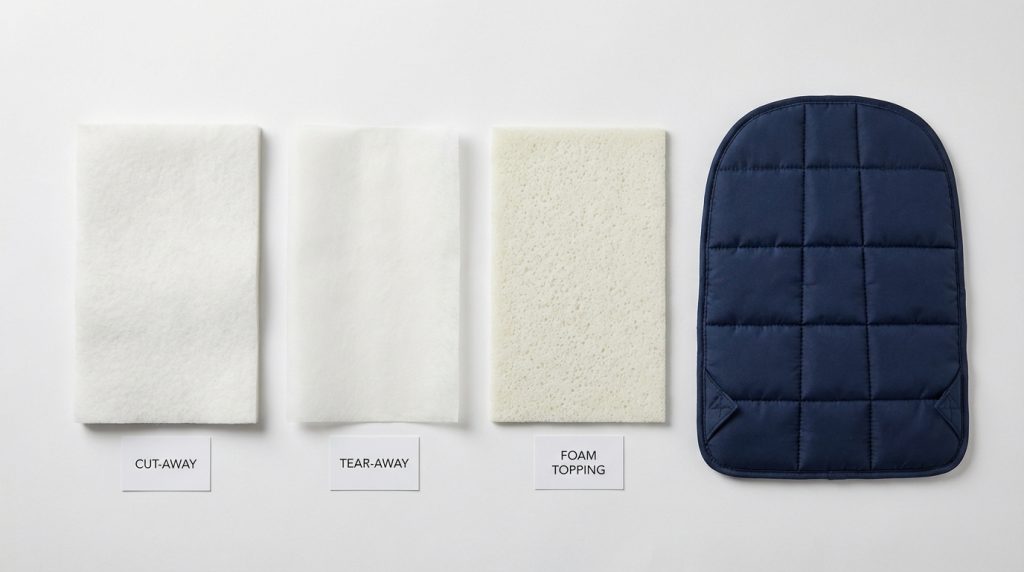
This is the single most important fix. Tear-away stabilizer is not strong enough for spongy backpack material. It tears during sewing, which lets the fabric shift freely and pucker badly.
Use a medium-weight cut-away stabilizer as your base. Cut-away stabilizer remains locked in place throughout the entire embroidery run, holding the spongy panel firm so the stitches cannot pull it inward. For extremely thick or heavily padded backpacks, use two layers of cut-away for maximum control.
Pro Tip: If the backpack cannot be hooped directly, use a floating method hoop the stabilizer alone, then attach the backpack panel to it with temporary spray adhesive.
Step 2: Lower Your Stitch Density
High stitch density is one of the top causes of puckering on spongy materials. When there are too many stitches per square inch, they compress the foam and drag the outer fabric inward.
For spongy backpack fabric, reduce your fill stitch density by 10 to 15 percent compared to what you would use on a flat cotton fabric. The result will look the same to the eye but will sit completely flat on the backpack panel. If you are not sure how to adjust density in your digitizing software, this is something a professional embroidery digitizing service can handle for you.
Step 3: Increase Pull Compensation
Spongy materials compress under the presser foot and then spring back after the needle lifts. This natural movement causes stitches to pull tighter than they appear in the software, which distorts shapes and creates tension puckering.
Pull compensation tells the digitizing software to make each stitch slightly wider to account for this compression. For spongy backpack fabric, a pull compensation of 0.4mm to 0.6mm is a good starting point. Adjust based on your test sew results. This one setting can dramatically reduce distortion on padded panels.
Step 4: Add a Water-Soluble Topping
A water-soluble topping is a thin, clear film you place over the top of the spongy backpack fabric before stitching. It gives the embroidery needle a firm surface to grab, which prevents stitches from sinking into the texture of the material.
Stitch through the topping along with the backpack panel. Once embroidery is complete, simply tear away the excess topping from around the design and dampen the remaining film with water it dissolves completely, leaving a clean, raised logo with no fuzzy surface texture showing through.
Step 5: Always Test on a Scrap First
Never embroider directly onto a customer’s backpack without running a test sew on the same or similar material first. A test run lets you catch puckering, density problems, and pull compensation issues before they ruin a finished product.
Cut a scrap of the same spongy backpack fabric, set it up identically with your stabilizer and topping, and run the full design. Check the result under good light before touching the actual backpack. This five-minute step saves hours of unpicking and re-stitching.
DIY Fix vs. Professional Digitizing
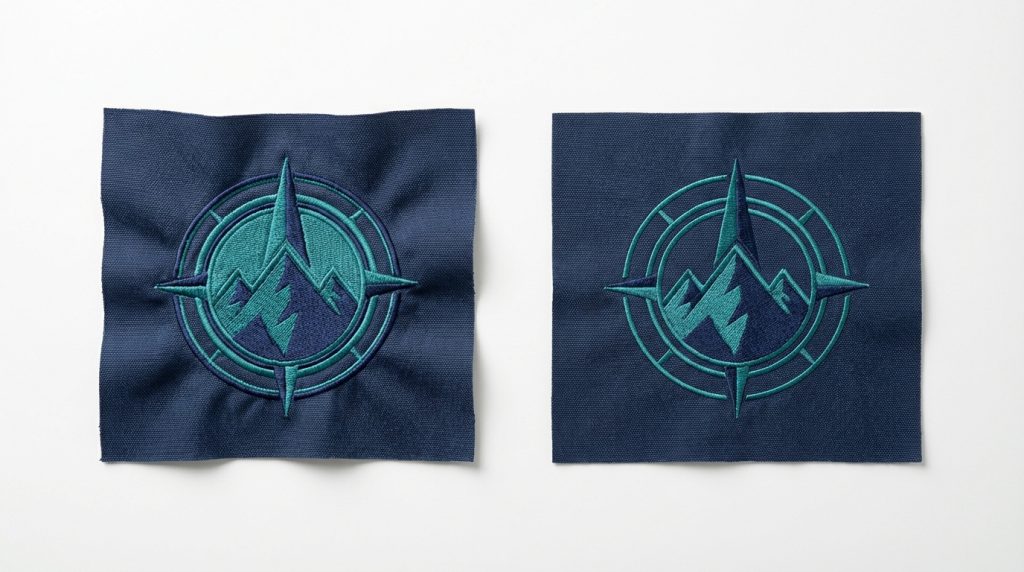
Most puckering problems on spongy backpack material come down to how the file was digitized not how it was sewn. If your original embroidery file was built for flat fabric, it will almost always pucker on a padded backpack because the density, underlay, and pull compensation settings are wrong for the material.
You can manually adjust settings yourself with experience, or you can simply send the design to Sassy Digitizing for a file that is built specifically for spongy backpack material correct density, correct pull compensation, correct underlay ready to sew clean the first time. See our pricing or check our portfolio to see the quality we deliver.
Summary
Backpack puckering on spongy material is always fixable. Use a cut-away stabilizer, reduce stitch density, dial in your pull compensation, add a water-soluble topping, and test before the real run. These five adjustments cover almost every puckering scenario you will encounter on padded backpack panels.
If the problem is in the digitizing file itself, Sassy Digitizing offers professional digitizing services and vector art services that are optimized for real-world production on every fabric type including the spongy ones.
AUTHOR BIO
Keith Blair | Senior Quality Control (HOD)
Keith Blair is the Head of Department for Quality Control at Sassy Digitizing, with 12 years of hands-on commercial embroidery experience. He specializes in diagnosing production issues like puckering, push distortion, and density failures across a wide range of fabric types from soft knitwear to padded backpack panels. Keith oversees digitizing standards for all complex jobs at Sassy Digitizing, ensuring every file is tested and production-ready before it reaches the customer.