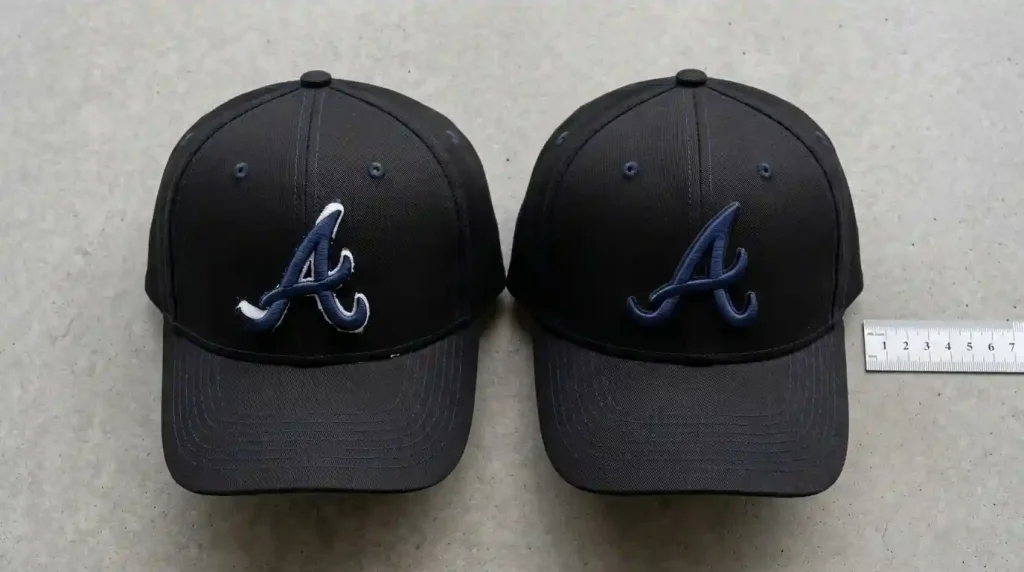
Common issues in cap 3D puff logos catch even experienced embroidery operators off guard. The foam lifts at the corners, the edges collapse on narrow sections, the capping stitches do not cover the foam completely, or the raised height is uneven across the design. The cap comes off the machine looking nothing like the premium, dimensional finish that 3D puff is supposed to deliver.
These problems are not random and they are not caused by the foam itself. Every common issue in cap 3D puff logos traces back to the digitizing file specifically the capping stitch density, the column width settings, the stitch sequencing, and the edge sealing technique used when the file was built.
This guide covers every problem, every cause, and every fix.
Why 3D Puff Embroidery Is Different from Flat Embroidery
3D puff embroidery places a layer of foam typically 3mm to 6mm thick beneath the capping stitches. The needle perforates the foam on every stitch, and the satin stitches pull tight over the foam surface to create the raised, dimensional effect. When everything is set correctly, the result looks bold, clean, and premium. When the digitizing is wrong, the foam fights the stitches and the result falls apart in predictable ways.
Understanding each failure mode makes it straightforward to identify exactly what needs to change in the file. For a full comparison of flat vs 3D puff digitizing, see our guide on cap flat logos vs cap 3D puff logos.
The Most Common Issues in Cap 3D Puff Logos
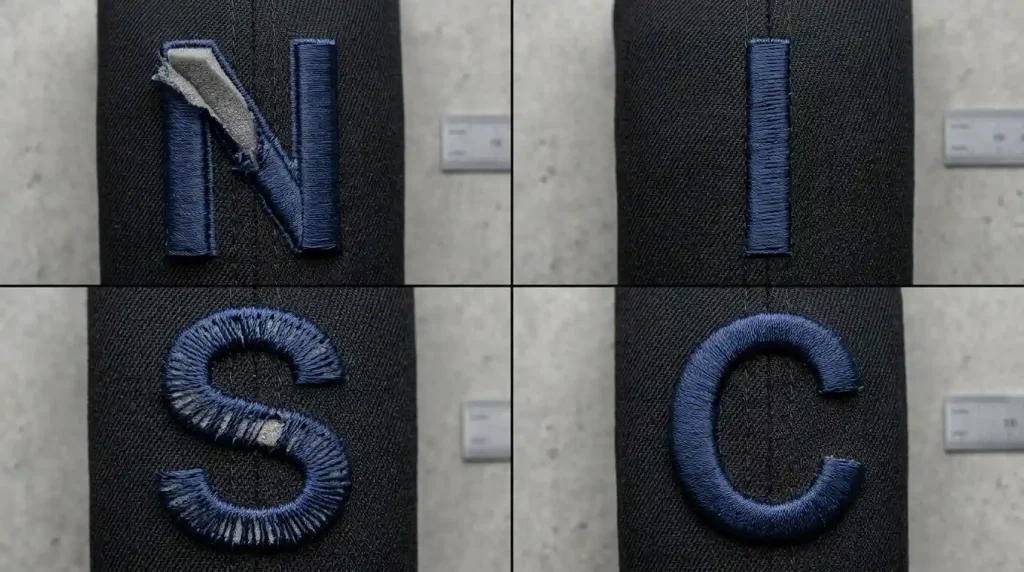
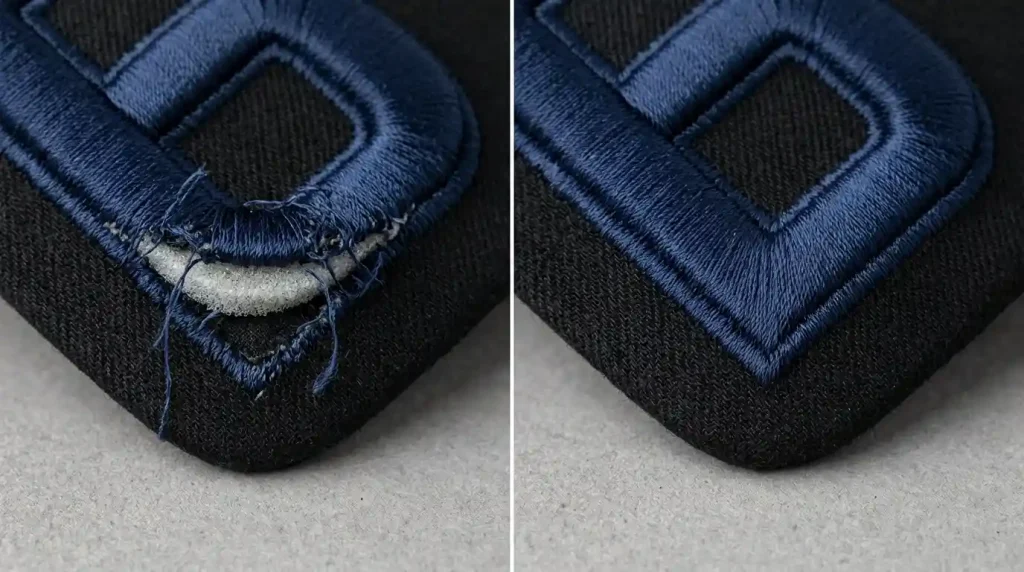
Issue 1: Foam Lifting at the Corners and Edges
Foam lifting happens when the capping stitches at the border of the design do not seal the foam edge tightly enough to the cap fabric beneath. The corners and sharp turns are the most vulnerable points the foam wants to spring back to its natural flat state, and if the border stitches are not tight and dense enough to hold it down, the foam lifts away from the cap surface.
Issue 2: Collapsed Sections on Narrow Elements
3D puff requires a minimum column width to work. When the design includes narrow strokes, thin letter elements, or fine details that are below 6mm wide, the capping stitches cannot hold the foam in position. The foam compresses under the needle and the raised effect collapses leaving a flat, messy section surrounded by correctly raised elements.
Issue 3: Exposed Foam Between Stitch Rows
When the capping stitch density is too low, gaps appear between stitch rows and the raw foam surface is visible through those gaps. This looks unfinished and amateur the foam texture is visible instead of a smooth, clean satin surface.
Issue 4: Uneven Raised Height Across the Design
Uneven height happens when different sections of the design use different foam thickness, or when the capping stitch density varies between elements in the file. One letter or section sits higher than adjacent elements, making the design look inconsistent and poorly constructed.
Issue 5: Foam Showing at Letter Ends and Terminals
At the start and end points of each letter element, the stitching sequence must seal the foam at every terminal. If the stitch path does not begin and end with tight sealing stitches over the foam edge, raw foam is visible at every terminal point of the design.
Step-by-Step: How to Fix Every Common Issue in Cap 3D Puff Logos
Step 1: Fix Foam Lifting Increase Border Stitch Density and Add Edge Sealing
Open your digitizing file and locate the border stitch settings for every element in the 3D puff design:
Increase capping stitch density at borders. The outer edge row of stitches must be set tighter than the interior fill. Use 0.30mm to 0.35mm at the border and 0.38mm to 0.42mm for the interior. This tighter border row compresses and seals the foam edge against the cap fabric.
Add an edge-walk stitch before the capping layer. Add an edge-walk running stitch that traces the outer boundary of each element. Stitch this before placing the foam. It creates a defined border the capping stitches can seal against. Without this, the foam edge has nothing to anchor to.
Extend capping stitches 0.5mm past the foam edge. The capping stitches must extend slightly past the physical edge of the foam and stitch into the cap fabric beneath. This wraps the foam edge and prevents lifting.
Pro Tip: Corner points and tight curves are the highest-risk areas for foam lifting. Reduce your stitch length to 2.0mm or less specifically at corners to pack more stitches into the turn and prevent the foam from springing back.
Step 2: Fix Collapsed Sections, Remove Puff from Narrow Elements

Go through your digitizing file and measure every column width in the 3D puff design:
Minimum column width for 3D puff is 6mm. Any element narrower than 6mm cannot physically hold the foam in position under the capping stitches. The needle-to-needle distance is too small, the foam compresses, and the raised effect disappears.
Convert narrow elements to flat embroidery. For any stroke, serif, or detail element below 6mm wide, remove the foam layer from that element and switch it to standard flat satin stitch. The thick main elements remain in 3D puff only the narrow sections change to flat. This is the same mixed technique used by premium cap brands and explained in detail in our guide on cap flat logos vs cap 3D puff logos.
Simplify the design if needed. If the entire design has elements below 6mm and cannot be simplified, the design is not suitable for 3D puff at all. Switching to flat embroidery entirely will give a cleaner result than forcing 3D puff on a design that cannot support it.
Step 3: Fix Exposed Foam, Increase Capping Stitch Density
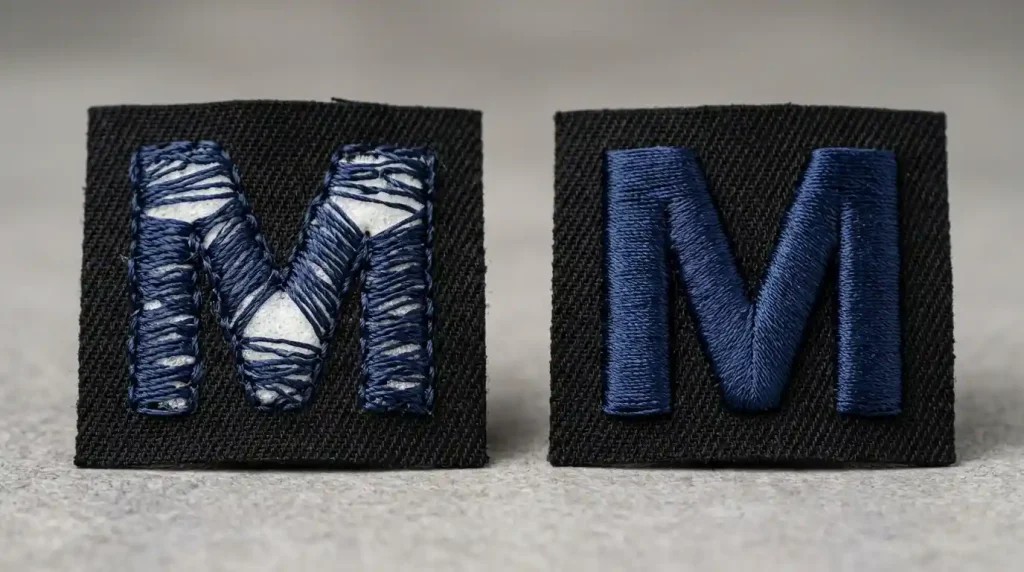
Exposed foam is a direct result of insufficient capping stitch density. Open your digitizing file and adjust:
Set capping stitch density to 0.33mm to 0.38mm. This is tighter than standard flat embroidery density because the stitches must compress and cover the foam surface rather than simply sitting on flat fabric. The foam pushes back against the stitches tighter density overcomes this resistance and produces a smooth, clean surface.
Use a consistent density across all elements. Use the same density value across every element in the design. If some elements are set to 0.40mm and others to 0.35mm, the finished design will have visible inconsistency in surface quality between adjacent letters or shapes.
Check stitch length. Stitch length for 3D puff capping should be set between 2.0mm and 2.5mm. Longer stitches cover more foam per stitch but leave larger gaps between needle penetration points increasing the risk of foam showing at the edges. Shorter stitches give tighter coverage.
Step 4: Fix Uneven Height, Use Consistent Foam Thickness and File Settings

Uneven height across a 3D puff design comes from two sources inconsistent foam thickness between elements, or inconsistent density settings between elements in the digitizing file:
Use one foam thickness throughout the entire design. Do not mix 3mm foam on some elements and 6mm foam on others in the same design. Choose one thickness typically 4mm for most structured caps and use it for every puff element in the design.
Standardize density across all elements. Go through every element in the digitizing file and confirm the capping density is identical across all of them. A single element set to a different density will compress the foam more or less than the surrounding elements, creating a visible height difference.
Check foam cutting precision. Cut the foam to exactly match the shape of each design element. Foam that is slightly larger than the element pushes the stitches upward unevenly. Foam that is smaller leaves gaps at the edges where the height drops. Precise foam cutting is as important as correct digitizing for even height results.
Step 5: Fix Exposed Foam at Terminals, Correct Stitch Sequencing
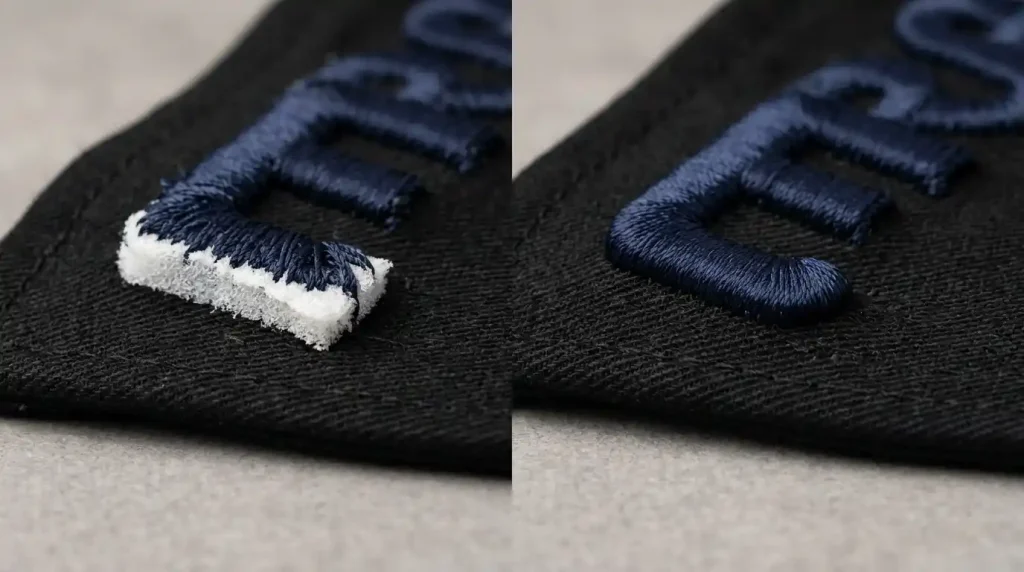
Exposed foam at the start and end terminals of each letter element is a stitch sequencing problem in the digitizing file:
Add sealing stitches at every start point. The first stitches of every 3D puff element must run along the starting foam edge and compress it flat against the cap fabric before the capping stitches begin traveling across the foam surface. In Wilcom, this is set as a start-seal option in the element properties.
Add sealing stitches at every end point. The final stitches of every element must similarly wrap over the ending foam edge. Without this, the foam end springs up after the needle moves away leaving a raw foam edge visible at the terminal of every letter.
Set start the stitch direction from the outer edge inward. Beginning the capping stitches from the outer edge of the foam and traveling inward ensures the first stitch always seals the outer edge. Starting from the center outward leaves the outer edge unsealed until the last stitch and the last stitch rarely seals as tightly as the first.
Step 6: Run a Test Stitch-Out on a Spare Cap
After correcting all issues in the digitizing file, always stitch a complete test on a spare cap of the same construction same structured front panel, same cap frame setup, same foam thickness.
After stitching the test, inspect these five points before approving for production:
Corner and edge sealing: Press each corner lightly with your fingernail. The foam should not lift. If any corner moves, return to the file and increase border density at that point.
Narrow section integrity: Check every thin element in the design. Any section showing collapsed or flat puff needs to be switched to flat embroidery in the file.
Surface coverage: Hold the test cap at eye level in good light. No raw foam should be visible anywhere on the surface. If foam texture shows through, increase capping density by 0.02mm and retest.
Height consistency: View the test cap from directly in front at eye level. All raised elements should appear at the same height. Any visible difference in height means foam thickness or density needs to be standardized.
Terminal sealing: Inspect every start and end point of every letter with a magnifying glass or close-up camera. No raw foam edge should be visible at any terminal.
When the 3D Puff File Needs to Be Rebuilt
If you have worked through every step above and your 3D puff cap logos are still producing multiple issues, the digitizing file was not built for 3D puff from the start. Many 3D puff problems come from flat embroidery files with foam added as an afterthought. These files never have the correct density, stitch sequence, or edge sealing for puff embroidery. Adding foam to a flat embroidery file always produces poor 3D puff results.
At Sassy Digitizing, every 3D puff file is built specifically for puff embroidery from the first stitch correct capping density, proper edge sealing, minimum column width enforced, consistent foam handling, and correct stitch sequencing. This builds a file that produces clean, raised, professional 3D puff on the first production run.
Visit our digitizing services page or contact us for a free quote on your 3D puff cap project.
Quick Fix Checklist
- ✅ Border density set to 0.30mm–0.35mm for edge sealing
- ✅ Edge-walk stitch added before foam placement
- ✅ Capping stitches extend 0.5mm past foam edge
- ✅ All elements checked minimum 6mm column width for puff
- ✅ Narrow elements below 6mm switched to flat embroidery
- ✅ Capping density standardized at 0.33mm–0.38mm across all elements
- ✅ One foam thickness used throughout entire design
- ✅ Sealing stitches added at every start and end terminal
- ✅ Stitch direction set to begin from outer edge inward
- ✅ Test stitch-out run on spare cap and all five points verified
Summary
Common issues in cap 3D puff logos foam lifting, uneven height, and unsealed terminals all have specific, fixable causes inside the digitizing file. Work through these six steps and your 3D puff cap logos will stitch clean, raised, and professional every single time.
For more on our 3D puff digitizing approach, see the master guide to custom 3D puff digitizing.
About the Author
Keith Blair | Senior Quality Control (HOD) Keith Blair serves as Head of Department for Quality Control at Sassy Digitizing, with 12 years of commercial embroidery experience. He specializes in 3D puff digitizing, cap embroidery production, capping stitch density, and foam handling for structured and unstructured caps.