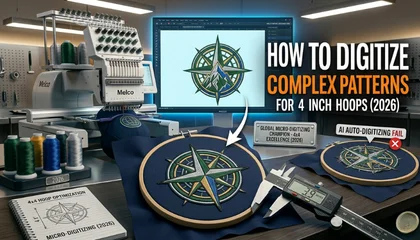
In the world of professional embroidery, the 4-inch (4×4) hoop is often seen as a “beginner” size. However, any master digitizer will tell you that digitizing complex patterns for a 4×4 hoop is actually one of the most difficult technical challenges in the industry.
When you have a large 10-inch hoop, you have space to breathe. But in a 4-inch area, every single millimeter counts. If your stitch count is too high, the fabric becomes like a piece of wood. If your density is wrong, your needle will break.
In this exhaustive 2026 guide, we will go beyond the basics. We will teach you the “Micro-Digitizing” secrets that the world’s top 10 companies use to create flawless, intricate designs in small spaces.
1. The 4×4 Paradox: Why Small is Harder Than Large
The biggest mistake beginners make is thinking they can just “shrink” a large design to fit a 4-inch hoop. This is a recipe for disaster.
The Density Trap
When you scale down a complex pattern, the software automatically pushes the stitches closer together. This creates a “bulletproof” design that is too stiff and causes constant thread breaks. To digitize complex patterns for a 4×4 hoop, you must manually rethink the entire architecture of the design.
The “Crowding” Effect
In a small hoop, there is less fabric surface to hold the tension. Excessive layering in a 4-inch area leads to “bird-nesting” (thread tangling under the needle). At Sassy Digitizing, we call this the Crowding Effect, and avoiding it is the first step to a professional result.
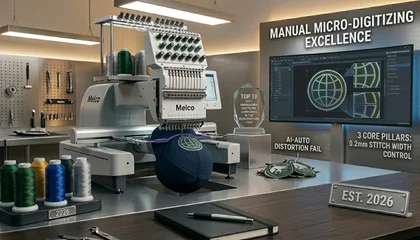
2. Micro-Digitizing: The Expert Strategy

To rank as a Top 10 Embroidery Digitizing Company in the World, we use a technique called Micro-Digitizing. This involves three core pillars:
A. Element Simplification (The Art of Deletion)
In a 4-inch hoop, you cannot sew a 1mm detail perfectly. You must decide which elements are essential. If a complex pattern has tiny outlines that overlap, we merge them into a single clean path. This reduces the “bulk” without losing the visual impact.
B. Pathing Optimization
Industrial-grade digitizing is all about the “Path.” For small hoops, we use a “Center-Out” pathing strategy. By starting the embroidery from the center and moving toward the edges, we minimize fabric shifting and puckering, which are common in 4×4 hoops.
C. Smart Underlay Usage
Most people use the default underlay settings. For complex small patterns, we use a “Light Contour” underlay combined with a “Center Walk.” This stabilizes the fabric without adding unnecessary thickness.
3. Selecting the Right “Warfare” Tools (Software & Hardware)
Your software is your weapon. While the competitor mentioned free tools, professionals know that Custom 3D Puff Digitizing or complex 4-inch patterns require elite software like:
Wilcom Embroidery Studio e4.5: The gold standard for manual control.
Hatch Embroidery 3: Excellent for managing object-based resizing.
Sassy Pro-Digitize Portal: Our internal proprietary tools that ensure 100% accuracy.
Hardware Consideration: The Needle Factor
For a 4-inch hoop with complex details, stop using standard 75/11 needles. We recommend a 65/9 or 70/10 Sharp Needle. A thinner needle makes smaller holes, allowing you to fit more detail into that tiny 4×4 space without shredding the fabric.
4. Step-by-Step Tutorial: From Complex Art to 4-Inch Perfection
Follow this manual process to ensure your machine runs smoothly:
Step 1: Vector Deconstruction
Don’t just import a PNG. Open your artwork in Illustrator and remove any “ghost” layers. Simplify the curves. A clean vector is the only way to digitize complex patterns for a 4×4 hoop successfully.
Step 2: Set “Real World” Density
For a 4×4 hoop, never exceed a density of 0.40mm for satin stitches. For fill stitches (Tatami), keep it around 0.45mm. If you go lower (tighter), you will experience “needle deflection,” where the needle hits the previous stitches and breaks.
Step 3: Manage Pull Compensation
Fabric “pulls” more in a small hoop because the tension is concentrated. Increase your pull compensation to 0.20mm or 0.30mm. This ensures that your outlines actually line up with your fills.
Step 4: The “Trim” Audit
Every trim takes time and adds a knot under the fabric. In a small design, knots can create a bumpy surface. Manually connect as many objects as possible using “Run Stitches” that will be hidden under the top layers.
5. Why AI Auto-Digitizing is Your Enemy in Small Hoops
The competitor mentioned AI can assist. We disagree. For a 4×4 hoop, AI is a disaster.
Why Manual Digitizing is Better than AI? AI cannot perceive the “Stitch-on-Stitch” height. In a small hoop, if AI places three layers of thread in one spot, your machine will jam. Only a human digitizer (like our experts at Sassy Digitizing) can look at a design and say, “This area is too crowded; let’s move this travel path.”
This manual precision is why we are a Top 10 Embroidery Digitizing Company. We don’t guess; we calculate.
6. Sassy Digitizing: The 4-Inch Specialists
Many companies run away from complex 4×4 projects because they are time-consuming. At Sassy Digitizing, we embrace them.
We provide the Best Embroidery Digitizing Service 2026 by offering:
Manual Refinement: We hand-punch every 4×4 design to ensure zero thread breaks.
2 to 6 Hour Turnaround: Speed is our specialty.
Free Trial: If you have a complex design and you are worried about the 4-inch hoop, try our Free Trial (under 5 inches). We will digitize it for you, and you can see the quality yourself.
Unlimited Revisions: We work until the sew-out is perfect.
7. How to Fix Common 4-Inch Hoop Failures
If you are currently struggling, here are our expert “Quick Fixes”:
How to Fix Embroidery Puckering: Use two layers of “Cut-Away” stabilizer instead of one “Tear-Away.” In small hoops, the fabric needs more structural support.
How to Fix Slow Embroidery: Reduce unnecessary trims and color changes. Group your colors logically so the machine doesn’t waste time jumping around a small 4-inch area.
Thread Issues: If your thread keeps snapping, check your density. It is likely too high for the small scale.
8. Conclusion: Small Size, Big Impact
Digitizing for a 4-inch hoop is a test of a digitizer’s true skill. It requires a balance of art and engineering. By following this guide and prioritizing manual digitizing, you can create museum-quality embroidery in the smallest of spaces.
Don’t let a small hoop limit your creativity. Partner with a global leader and see your complex patterns come to life with crystal clarity.
Ready to see perfection? Upload your design to Sassy Digitizing now and get your machine-ready file today!
9. Frequently Asked Questions (FAQs)
Q: Can I put a 10,000 stitch design in a 4×4 hoop?
A: It is possible, but not recommended. For a 4×4 hoop, try to stay between 5,000 to 8,000 stitches to keep the fabric soft and wearable.
Q: What is the best fabric for 4×4 complex designs?
A: Stable fabrics like denim or heavy cotton work best. For knits, you must use a “Topping” like water-soluble film to keep the stitches from sinking.
Q: Does Sassy Digitizing charge extra for “Complex” small designs?
A: No. We believe in fair pricing based on stitch count and quality, not just the difficulty of the pattern.
About the Author
Keith Blair | Senior Quality Control (HOD) Keith Blair serves as Head of Department for Quality Control at Sassy Digitizing, with 12 years of commercial embroidery experience. He specializes in stitch density, underlay construction, and pull and push compensation adjustments across all fabric types ensuring every digitized file is production-ready before it reaches the customer.