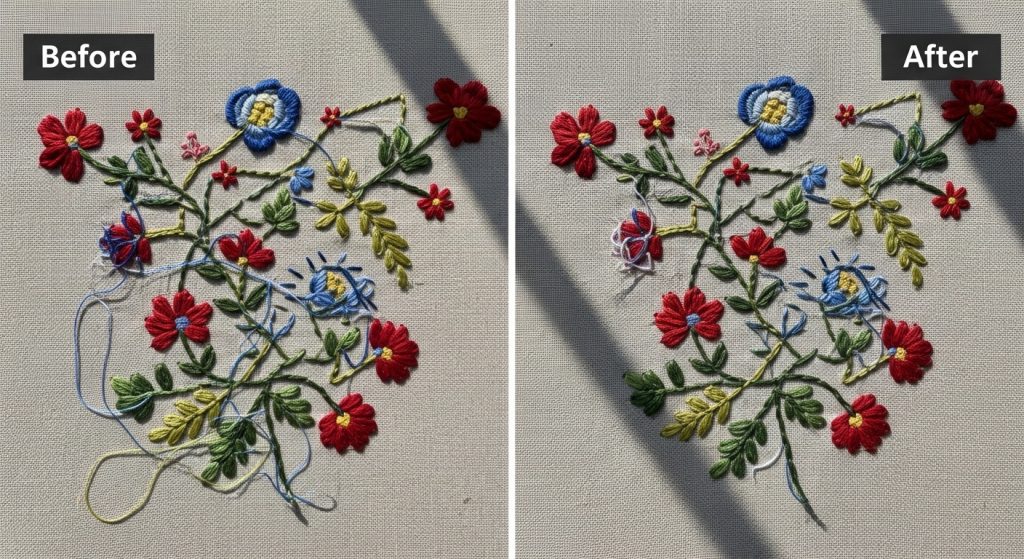
Jump stitches are the connecting threads that move the needle from one area of the design to another without stitching visible patterns. When these show up on the finished garment, they make your embroidery look unprofessional and messy.
The good news? Most jump stitch problems can be fixed by editing the digitized file before production. The challenge is knowing where to add trim commands, adjust stitch sequencing, and optimize pathing so the machine automatically cuts threads instead of leaving long visible jumps.
In this guide, we’ll show you exactly how to edit embroidery files to eliminate visible jump stitches, whether you’re working with digitizing software or outsourcing to professionals.
Why Jump Stitches Show on Your Embroidery
Jump stitches become visible when:
- No trim command is added between color changes or sections
- Poor stitch sequencing forces the needle to travel long distances across the design
- Auto-digitized files don’t optimize travel paths
- Manual trimming is skipped during production (which shouldn’t be necessary with a proper file)
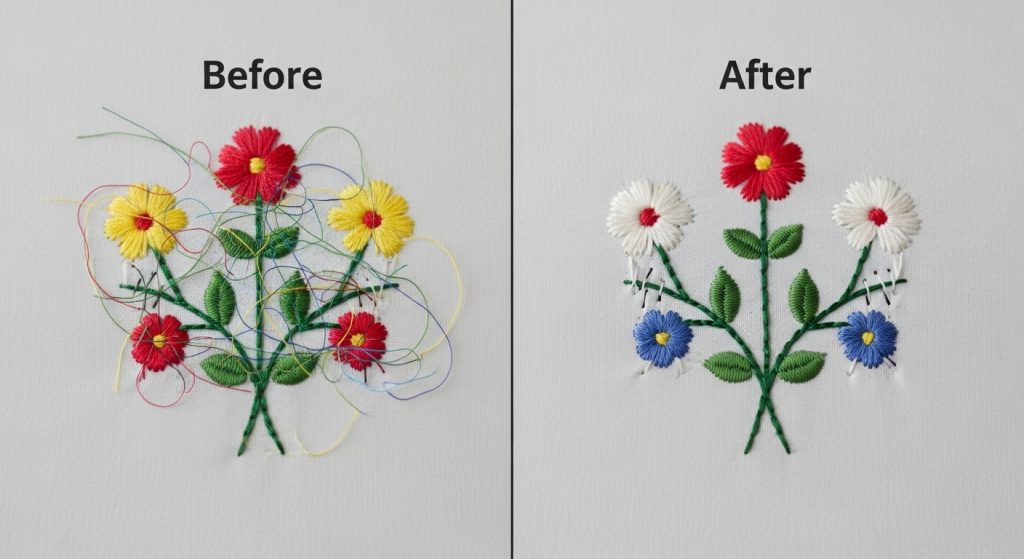
Even if your production team trims threads manually after stitching, long jumps can still pull fabric, create tension issues, or snag during wear. The cleanest solution is fixing the file itself.
Important: If you’re dealing with files that consistently have jump stitch problems, you may need professional embroidery digitizing services to rebuild them properly. Poorly digitized files often require a complete re-sequence rather than quick edits.
Step 1: Open the File in Digitizing Software
To edit jump stitches, you’ll need embroidery editing software like:
- Wilcom (industry standard)
- Hatch Embroidery
- PE-Design (Brother)
- Embrilliance (Mac/PC)
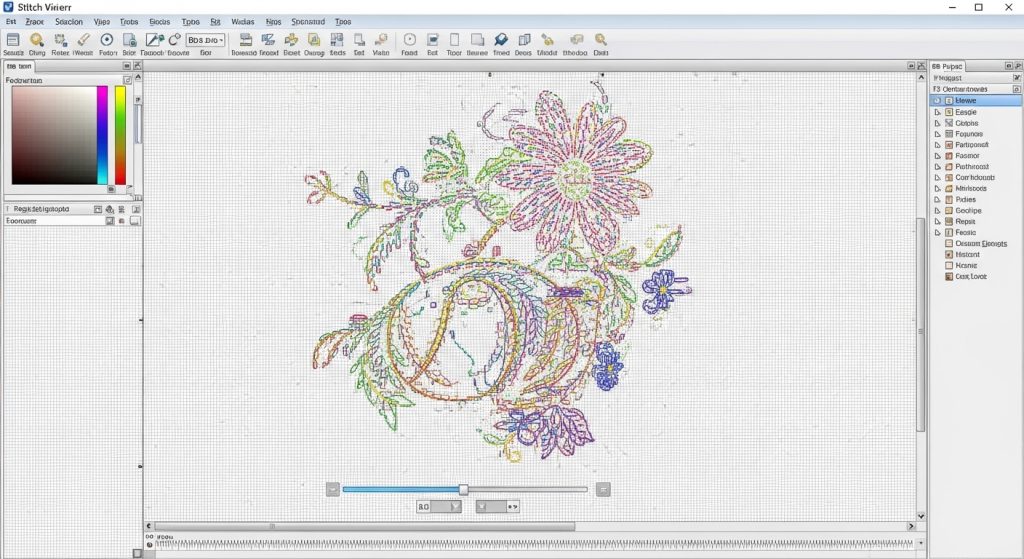
Once the file is open, switch to stitch view mode instead of design view. This lets you see the exact stitch-by-stitch path the needle will take, including all jump stitches.
Look for long diagonal or horizontal lines connecting different parts of the design. These are your jumps. The longer they are, the more visible they’ll be on the finished product.
Step 2: Add Trim Commands Between Sections
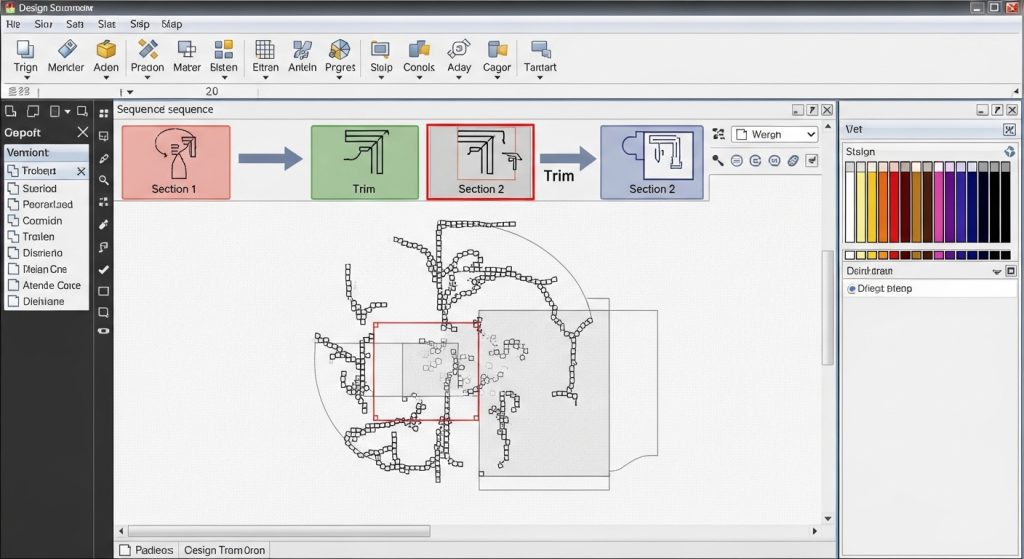
The easiest fix is adding trim commands at the end of each section before the needle moves to a new area.
Here’s how it works:
- Identify where the jump stitch occurs
- Click at the end of the section (before the jump)
- Insert a trim command from your software’s toolbar
- The machine will now cut the thread automatically instead of leaving a long jump
Most software shows trim commands as small scissor icons or highlighted markers in the stitch sequence. Add these wherever you see jumps longer than 3-4mm.
Pro Tip: Don’t over-trim. Too many trims slow down production and can cause thread breaks. Only trim when the jump would be visible or cause tension problems.
Step 3: Re-Sequence Sections to Reduce Travel Distance
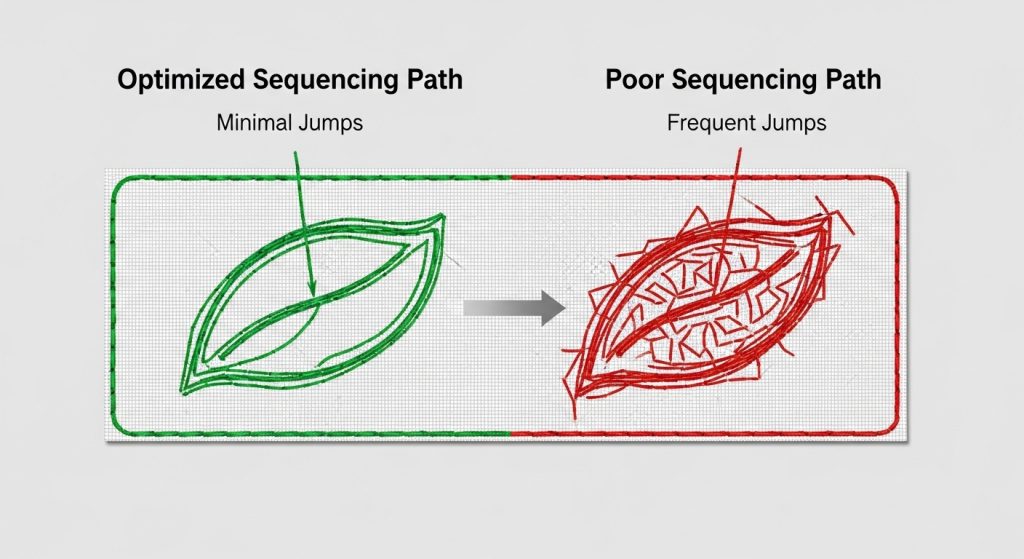
Sometimes the problem isn’t missing trims—it’s inefficient pathing. If your file stitches the left side of a logo, jumps all the way to the right, then comes back to the middle, you’re creating unnecessary travel.
Re-sequencing means changing the order sections are stitched to minimize jump distances:
- Stitch nearby elements consecutively
- Group sections by color to reduce color changes
- Move from top to bottom or left to right in a logical flow
In your digitizing software, you can usually drag and drop stitch blocks to reorder them. Test different sequences until the needle travels the shortest total distance.
This not only reduces visible jumps but also speeds up production time.
Step 4: Use Underlay to Hide Small Jumps
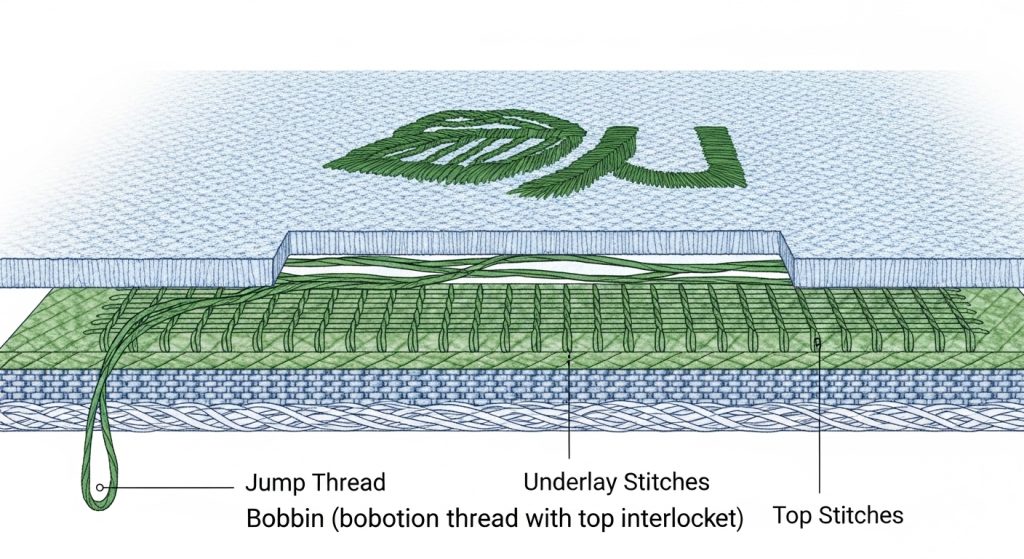
For very short jumps (under 3mm), adding a trim command might cause more thread breaks than it’s worth. Instead, use underlay stitching to bury the jump thread under the next layer.
Underlay is a foundational stitch layer that sits beneath your main fill or satin stitches. If planned correctly, it can trap small jump threads, so they don’t show on the surface.
This technique works best on:
- Dense fill areas (satin, tatami)
- Designs with multiple stitch layers
- Fabrics where thread can sink slightly (fleece, terry cloth)
Just make sure the underlay density is sufficient to actually cover the jump. If it’s too sparse, the thread will still peek through.
Step 5: Test the Edited File
Before running full production, always test your edited file on the same fabric type and thread you’ll use for the final order.
Check for:
- Visible jumps remaining (if any, go back and add more trims)
- Thread breaks (too many trims can cause this)
- Tension issues (make sure trimmed ends don’t pull fabric)
- Proper sequencing (sections should stitch in logical order)
If everything looks clean, your file is ready. If not, repeat Steps 2-4 until the jumps disappear.
DIY Editing vs. Professional Re-Digitizing
Can you fix jump stitches yourself? Yes, if you have the software and experience. But there are limits:
DIY Editing:
- Time Required: 30 minutes to 2 hours per file
- Works Best For: Simple fixes, adding a few trims
- Limitations: Can’t fix fundamental sequencing problems in badly digitized files
Professional Re-Digitizing:
- Time Required: Same-day turnaround with experts
- Works Best For: Complex designs, files that need complete rebuilding
- Benefits: Optimized pathing, proper trims, tested for production
If your file has dozens of visible jumps or was auto-digitized, it’s often faster and cheaper to have it professionally re-digitized than to manually edit every section. Sassy Digitizing rebuilds problematic files with manual pathing, optimized trims, and tested stitch sequences—so you never have to worry about jump stitches showing again.
Summary
Visible jump stitches make embroidery look unprofessional, but they’re fixable. To edit files and eliminate jumps:
- Open the file in digitizing software and locate long jump stitches
- Add trim commands between sections to auto-cut threads
- Re-sequence stitch blocks to minimize travel distance
- Use underlay to hide very short jumps
- Test the file on sample fabric before production
For files that need complete rebuilding or if you don’t have editing software, professional embroidery digitizing services can fix jump stitch problems quickly. Sassy Digitizing specializes in clean, production-ready files with optimized pathing and automatic trims—so your designs come out perfect every time.
About the Author
Keith Blair | Senior Quality Control (HOD)
Keith Blair serves as the Head of Department for Quality Control at Sassy Digitizing, bringing 12 years of commercial embroidery experience to the team. His role focuses on the technical mechanics of digitizing, specifically adjusting stitch densities and lengths to suit different fabric types.
A specialist in advanced production methods, Keith oversees the digitizing standards for complex 3D puff, appliqué, and small lettering projects. He ensures that every file is tested for efficiency and run ability before it reaches the customer, bridging the gap between digital design and physical production.