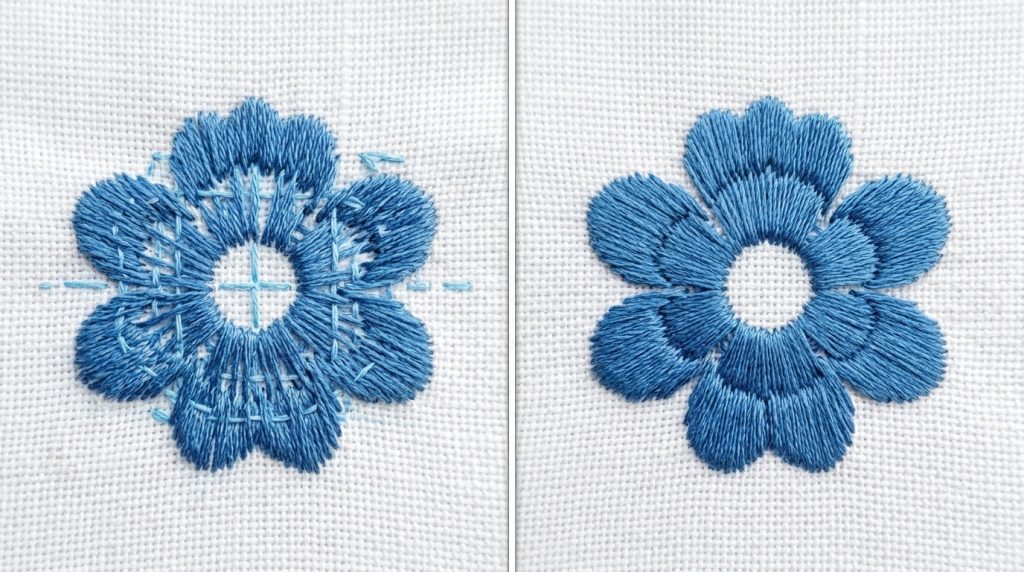
If your embroidered design is coming out stiff, raised, or distorted, the reason is almost always too many stitches making the design bulky. High stitch density is one of the most common embroidery digitizing mistakes and this guide shows you exactly how to fix it.
That said, let’s be real: over-stitching does not just look bad it damages your fabric, breaks your needles, and wastes production time. Whether you are running a single garment or a bulk order, getting the stitch count right is everything.
Why Too Many Stitches Make the Design Bulky

When too many stitches making the design bulky is the problem, it always comes down to three root causes.
Stitch density set too tight. Every fill and satin stitch has a spacing value measured in millimeters. Standard fill density sits around 0.40mm to 0.45mm. Anything tighter than 0.35mm packs stitches so close together that the thread has nowhere to go except upward creating that stiff, raised look.
Too many underlay layers. Underlay stabilizes the fabric before the top stitches begin. But adding too much underlay especially on small designs locks the fabric rigid before a single visible stitch is even placed. The design ends up sitting on a dense foundation that makes everything above it look and feel heavy.
Too much detail forced into a small size. Gradients, shadows, and tiny lettering at small sizes require extra stitches to “fill in” the detail. At 2 or 3 inches, those extra stitches have nowhere to go and stack directly on top of each other.
According to Wilcom’s embroidery production guidelines, proper stitch density calibration is one of the most critical factors in achieving clean, production-ready embroidery files.
How to Fix It; Step by Step
Step 1: Check the Stitch Count Against the Design Size
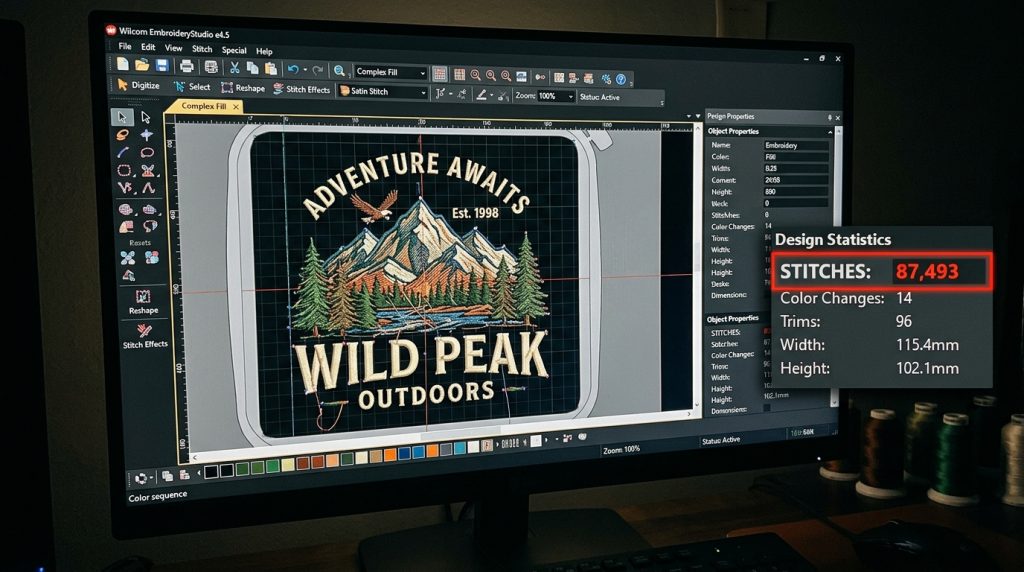
Before sending any file to the machine, check these benchmarks:
- A left-chest logo (3–4 inches) → 6,000 to 12,000 stitches
- A cap design (2–2.5 inches) → under 8,000 stitches
- A small text block (under 1 inch tall) → under 1,500 stitches
If your count is higher than these ranges, the file is over-digitized. Open it in your digitizing software and inspect the density settings before the machine ever starts running.
Step 2: Lower the Fill Stitch Density
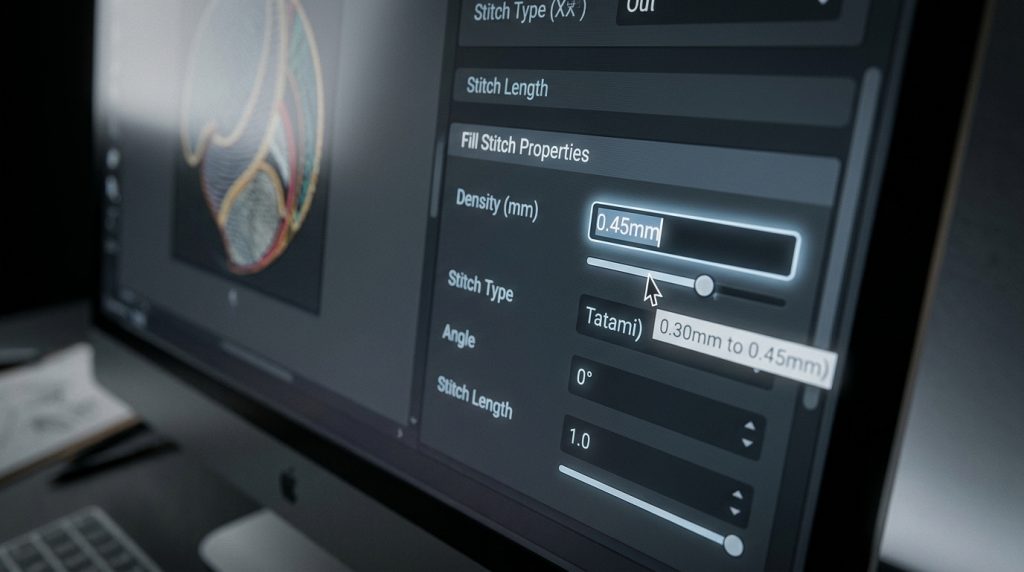
Open the fill stitch properties for the over-packed area. Increase the spacing moving from 0.30mm to 0.40mm or 0.45mm is usually enough to eliminate bulk without losing coverage.
Pro Tip: On stretchy fabrics like jersey or fleece, always go looser 0.45mm to 0.50mm because the natural fabric movement between stitches provides coverage that tight spacing cannot improve.
Step 3: Reduce or Simplify the Underlay
For most standard designs on stable woven fabrics, a single run-stitch underlay is enough. Only use edge-walk plus zigzag combinations on large fill areas above 1.5 inches wide or on unstable fabrics like knits. Removing one unnecessary underlay layer can cut your total stitch count by 15 to 20 percent with zero visible difference in quality.
Step 4: Simplify the Design Elements

If your design includes gradients or blended shadows at a small size, remove them. What looks smooth on a software screen looks heavy and stiff on real fabric. Simplify to solid color zones and clean outlines. The cleaner the design, the lower the stitch count, and the better the final result on any garment.
The Quick Fix Checklist
Run through this before every production job:
- Stitch count matches the design size range ✓
- Fill density is 0.40mm or above for stable fabrics ✓
- Underlay is minimal one layer for small designs ✓
- No unnecessary gradients or shadows at small sizes ✓
- File has been tested on a sew-out before full production ✓
When to Let a Professional Re-Digitize It
Sometimes the file is so over-engineered that adjusting settings is not enough. If you have reduced density and the design is still stiff and raised, it needs to be rebuilt from scratch with the correct stitch logic applied from the beginning.
At Sassy Digitizing, every file is manually digitized using Wilcom software with stitch density tested against your specific fabric type. If a file you received elsewhere is causing bulk or puckering, our team will re-digitize it correctly and get your production running smoothly. The fix for too many stitches making the design bulky is always in the file lower the density, simplify the underlay, and re-digitize if needed. View our pricing re-digitizing starts from just $15.
Summary
Too many stitches making the design bulky is never a machine problem it is always a file problem. Fix the density, clean up the underlay, simplify the design, and your embroidery will lie flat and clean every single time. When in doubt, have it professionally re-digitized and save yourself the wasted garments and production downtime.
Need your file fixed today? Contact Sassy Digitizing and get it sorted fast.
About the Author
Keith Blair | Senior Quality Control (HOD) Keith Blair is the Head of Quality Control at Sassy Digitizing with 12 years of hands-on commercial embroidery experience. He specializes in stitch density, underlay construction, and production efficiency ensuring every file that leaves Sassy Digitizing runs cleanly on the first attempt.