When your embroidered letters look puffy, shifted, or have uneven edges, the problem is almost never the satin stitch. Nine times out of ten, the real issue is a poorly optimized tackdown stitch or worse, no tackdown at all.
This guide breaks down exactly how to fix it.
What Is a Tackdown Stitch in Embroidery Lettering?
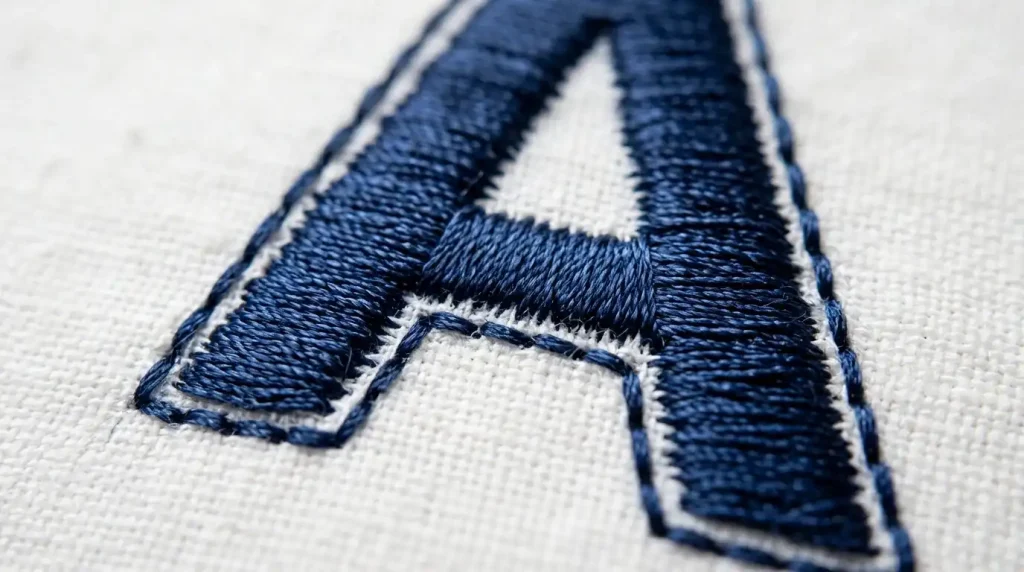
A tackdown stitch is a short running stitch that traces the outer edge of a letter before the main fill or satin stitches are sewn. Its entire job is one thing: anchor the fabric so it cannot shift while the machine fills in the letter.
Without it, the needle’s repeated punching motion pushes the fabric in small increments. By the time you finish a word, those small shifts add up into something very visible and very unprofessional.
Note: This is not the same as underlay. Underlay supports the fill from underneath. The tackdown locks the perimeter of the letter shape against the fabric before anything else begins.
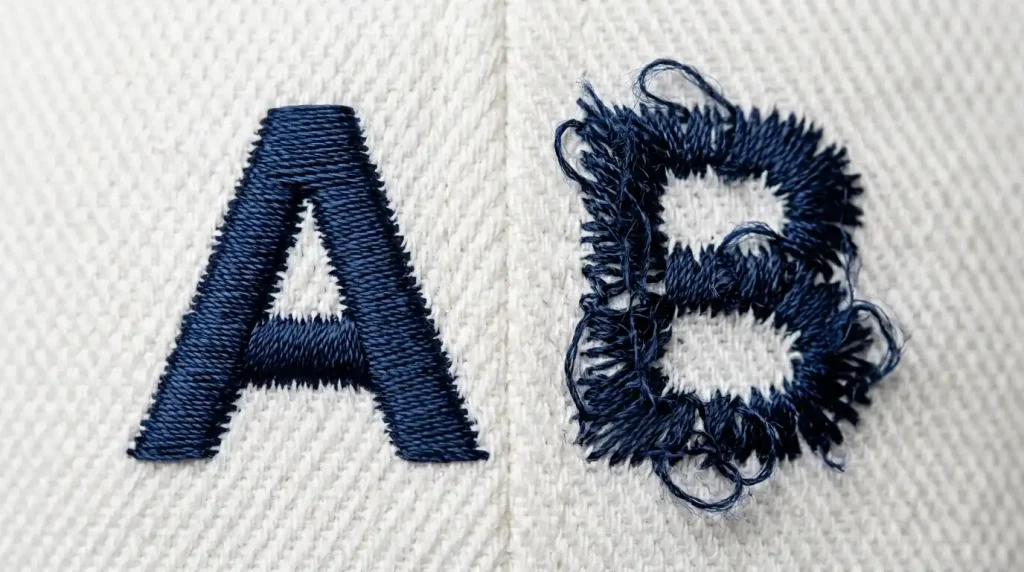
The Problem: What Happens Without Proper Tackdown

Here is what you will see when tackdown is missing or incorrectly set around letters:
- Letter edges lift or curl away from the fabric after washing
- Satin columns appear uneven in width, wider at one end than the other
- Small letters (under 8mm) lose their shape entirely
- The fabric puckers or bubbles at letter corners and curves
These are not machine problems. They are digitizing decisions that were made incorrectly upstream.
Step 1: Set the Correct Tackdown Offset
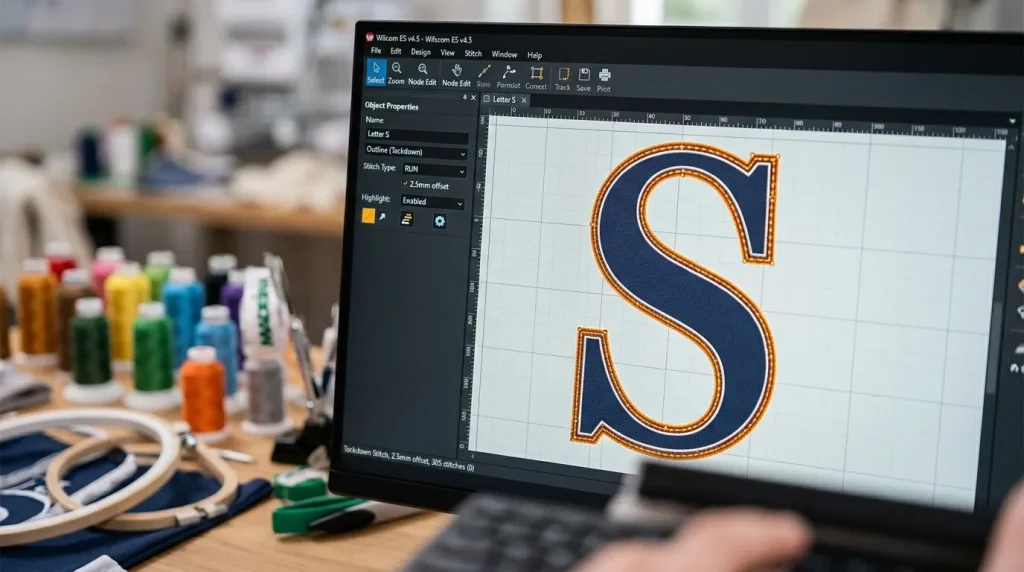
The tackdown path should sit 0.3mm to 0.5mm inside the letter’s outer edge. Not on the edge inside it. This is called the inset offset.
Why inset? Because the satin stitch that follows will cover and bury that tackdown line completely. If you place the tackdown on the outer boundary, the satin stitches will push fabric outward past the intended border, making your letter appear bigger and blurry.
For small lettering under 10mm: Reduce the offset to 0.2mm. Small letters have less room to absorb errors, and a full 0.5mm inset will choke the letter shape.
At Sassy Digitizing, every letter file is manually checked to ensure the tackdown sits at the correct inset one of the reasons our files run cleanly on the first sew-out.
Step 2: Stitch Direction and Density of the Tackdown
A tackdown stitch should always run in the same general direction as the satin columns that follow it. If your satin columns run vertically, your tackdown running stitch should travel vertically along the letter edge before laying down each column.
Density rule: Keep your tackdown stitch length between 1.8mm and 2.2mm. Shorter than 1.8mm creates too much perforation on the fabric edge, which weakens the base. Longer than 2.2mm leaves gaps that the satin stitch cannot fully cover.
For curved letters like “C”, “S”, or “O”, the tackdown path needs to follow the curve smoothly. Jagged or angular tackdown paths on curves will show through the satin finish as tiny bumps.
Step 3: Tackdown for Applique Letters vs Fill Letters
These two letter types need different tackdown approaches.
For fill-stitch letters: A single pass of running stitch along the inside perimeter is enough. The fill density of the top stitches is high enough to lock everything down.
For applique letters: You need two tackdown passes one to hold the fabric piece in place, and a second tighter pass after trimming to seal the edge before the satin border is sewn. Skipping the second pass is the most common reason applique letters fray after washing. You can learn more about how we handle applique digitizing in our full services section.
Summary
A clean tackdown stitch is one of the smallest settings in a digitizing file, but it controls the quality of every letter in your design. Get the inset right, match the stitch direction to your satin columns, and treat applique letters differently from fill letters.
If you want letters that run clean on the first attempt without constant re-hooping or thread breaks, Sassy Digitizing manually optimizes every one of these details before your file reaches your machine. Whether it is a small monogram or a full jacket back with text, our digitizing services are built around getting it right the first time.
About the Author
Keith Blair | Senior Quality Control (HOD) Keith Blair brings 12 years of commercial embroidery experience to his role as Head of Quality Control at Sassy Digitizing. He specializes in stitch mechanics including underlay, density, and tackdown optimization ensuring every file is production-ready before it reaches the customer.