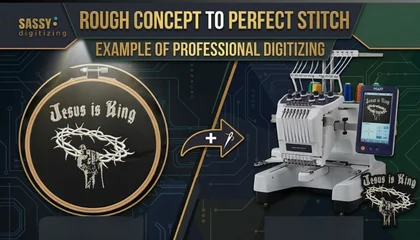
The Challenge: Bringing a Vision to Life
In the professional embroidery world, most clients provide a finished logo. They simply ask for a stitch file. However, sometimes a client comes to us with a vision. They do not just have a file. Instead, they have a concept.
Recently, we worked on a project that proves why manual precision is superior. The goal was to create a powerful design. This design featured a fist, a crown, and a strong message. Therefore, the journey from idea to final sew out required true technical mastery.
Phase 1: The Initial Idea and Design Shift
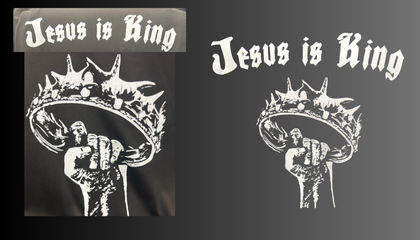
The project started when a customer approached Sassy Digitizing with a unique idea. Initially, the customer shared a high contrast image of a fist holding a royal crown. It also included a bold Gothic font that read, Jesus is King.
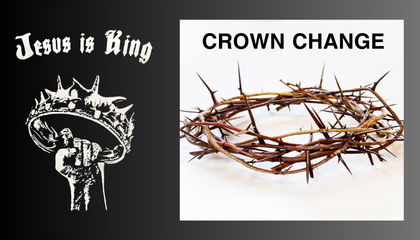
However, the customer soon realized the royal crown did not fit the spiritual message. They wanted the design to be more meaningful and symbolic. Because of this, they requested a major change. They asked us to replace the royal crown with a Crown of Thorns. Additionally, the customer provided a high definition photograph of a real Crown of Thorns for our reference. This became our new
blueprint for the project.
Phase 2: The Technical Challenge From Photo to Thread
Replacing a standard shape with a complex, tangled Crown of Thorns is a massive challenge. In fact, most embroidery companies cannot handle this level of detail. It requires transforming a 3D photograph into a 2D stitch file.
You must maintain the sharp look of the thorns without breaking needles. Furthermore, you must avoid bird nesting on the embroidery machine. This is exactly why our manual precision digitizing becomes essential. While other companies struggle with such intricate work, we thrive on it. Our team prepared to hand punch every single thorn to ensure a flawless result.
Phase 3: The Digitizing Process
Our master digitizers spent many hours building the design manually. We focused on every detail to ensure high industrial quality.
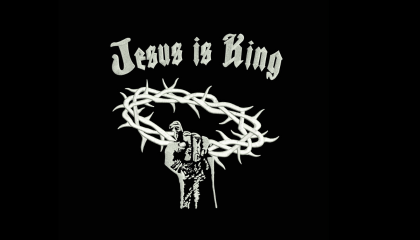
First, we worked on the fist. We kept the raw texture of the original art. We used different stitch angles to give the hand a realistic gripping effect. Next, we moved to the Crown of Thorns. We digitized each thorn as a separate path. Consequently, every sharp point remained defined during the stitch out. Finally, we manually merged the fist and the thorns. This made the hand appear to be firmly grasping the crown. We also arched the text perfectly over the top for a professional layout.
Phase 4: The Result A Perfect Sew Out
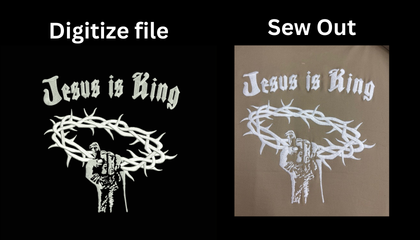
We delivered the file after our Quality Assurance team approved it. The true test came when the customer ran the file on their machine.
As seen in the final production photo, the results were amazing. The white thread on the tan fabric showed incredible detail. For example, every sharp point was clearly visible. The Gothic text was clean and readable. Because we focused on quality, the customer was thrilled. We successfully translated their dream into a physical masterpiece.
Why Choose Sassy Digitizing for Your Projects?
This case study shows that we are more than just a digitizing service. We are a top 10 embroidery digitizing company that understands the craft. We do not just trace images. We build them for production.
Creative Flexibility: We work with your ideas to create exactly what you want.
Industrial Efficiency: Our files are optimized for high speed runs with no thread breaks.
First Trial Free: We offer a free trial for your first logo under 5 inches. Therefore, you can experience this quality yourself.
Conclusion: Lets Build Your Vision Together
Do not settle for average quality when you can have a masterpiece. If you have a complex design, bring it to Sassy Digitizing. We love technical challenges. Additionally, we pride ourselves on delivering quality that exceeds expectations. From the first photo to the final sew out, we are your partners in excellence.
Frequently Asked Questions (FAQs)
Can you digitize a design based on a real photograph?
Yes! As shown in this case study, we can take a high-quality photo and manually convert it into a production-ready embroidery file.
How do you handle complex designs with lots of sharp points?
We use manual pathing to ensure every sharp detail is digitized correctly. This prevents thread breaks and ensures the design looks clean on the fabric.
What is the turnaround time for custom conceptual designs?
Most designs, even complex ones, are delivered within 2 to 4 hours with full quality assurance.
How do I get my first logo digitized for free?
Simply visit the Sassy Digitizing website, upload your artwork, and claim your first trial free offer for any design under 5 inches.
About the Author
Keith Blair | Senior Quality Control (HOD) Keith Blair serves as Head of Department for Quality Control at Sassy Digitizing, with 12 years of commercial embroidery experience. He specializes in stitch density, underlay construction, and pull and push compensation adjustments across all fabric types ensuring every digitized file is production-ready before it reaches the customer.


