
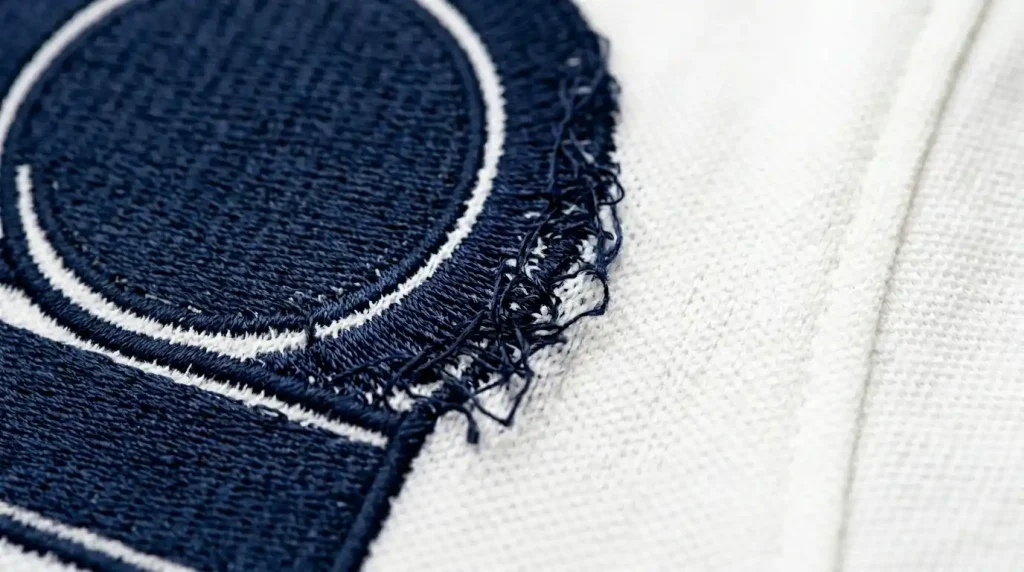
Embroidery fill stitches leaking outside the outline is one of the most frustrating problems in production embroidery especially because it looks like a machine tension problem when it is almost always a digitizing file problem. Adjusting machine tension, changing needles, or re-hooping the garment will not fix it. The fix is in the digitizing settings, and this guide walks through every cause and every solution step by step.
What Causes Fill Stitches to Leak Outside the Outline
Three specific causes create fill stitch leaking outside the outline and every single one lives in the digitizing settings.
Cause 1: Pull Compensation Too High Pull compensation widens fill stitches to compensate for fabric contraction. When you set this value too high for your fabric, stitches push past the border outline physically.
Cause 2: Fill Stitch Angle Pointing Into the Border Fill stitch rows running perpendicular to a border edge drive momentum directly through that edge. Rotating the angle to run diagonal or parallel stops this immediately.
Cause 3: No Satin Border Stitched Last A missing satin border is the third cause. Without a border stitching last over the fill edge, every irregularity at the fill boundary stays visible in the final result.
These same three causes drive cap logo fill stitches overflow their borders too. the physics are identical on both flat garments and curved cap surfaces.
Step 1: Identify Which Setting Is Causing the Leak
Open your design in your embroidery digitizing software and select the fill stitch object that is leaking.
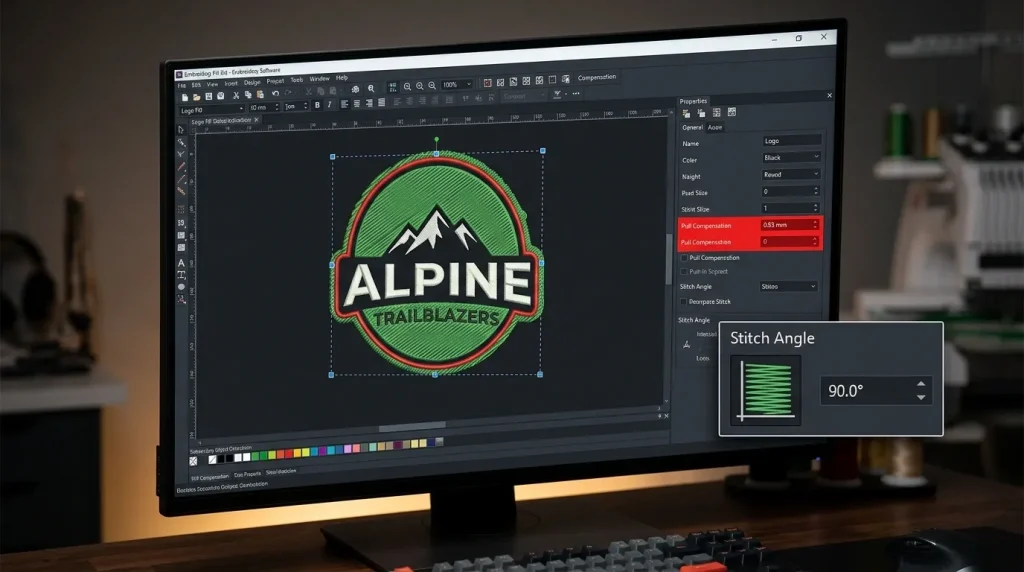
Check these three values in the object properties panel:
Pull Compensation: What is the current value? Woven fabrics like polo and twill need pull compensation between 0.3mm and 0.4mm. Knit fabrics require a lower range of 0.2mm to 0.3mm. Stiff structured cap fabric sits between 0.2mm and 0.35mm the least forgiving of all fabric types. Any value above these ranges is a likely cause of the leak.
Stitch Angle: What direction are the fill rows running relative to the nearest border edge? If they run at 90 degrees to the border directly into it rotate the angle to 45 degrees as a starting point.
Sew Order: Is the border outline stitching before or after the fill? Open the sequence panel and check. If the border comes before the fill, the fill stitches are landing on top of and outside the border. Reverse the order fill first, border outline last.
For a full reference on correct values by fabric type, our guide on best embroidery digitizing settings for hats and caps has the complete settings breakdown, and similar principles apply to flat garments.
Step 2: Fix Pull Compensation First
Pull compensation causes fill stitch leaking more than any other setting. Fix this one first before you touch anything else.
Reduce pull compensation by 0.1mm at a time. Run a test stitch after each adjustment. Stop at the lowest value where fill stitches reach the border cleanly without pulling inward or overflowing outward.
Starting values by fabric:
- For woven twill or canvas, set pull compensation between 0.3mm and 0.4mm
- Soft knit and fleece fabrics need a lower range of 0.2mm to 0.3mm.
- Structured cap fabric sits between 0.2mm and 0.35mm.
- thick terry and towel fabrics require a slightly higher range of 0.4mm to 0.5mm.
After correcting pull compensation, re-check stitch density. Sometimes high density combined with high pull compensation creates compounding overflow reducing pull compensation alone may not be enough if density is also set too tight. Row spacing of 0.4mm to 0.45mm is the standard for most woven garment fabrics and is directly related to the density principles in how to shrink embroidery designs without losing detail.
Step 3: Adjust Stitch Angle and Add Satin Border Last
After fixing pull compensation, address the stitch angle and border sequence.
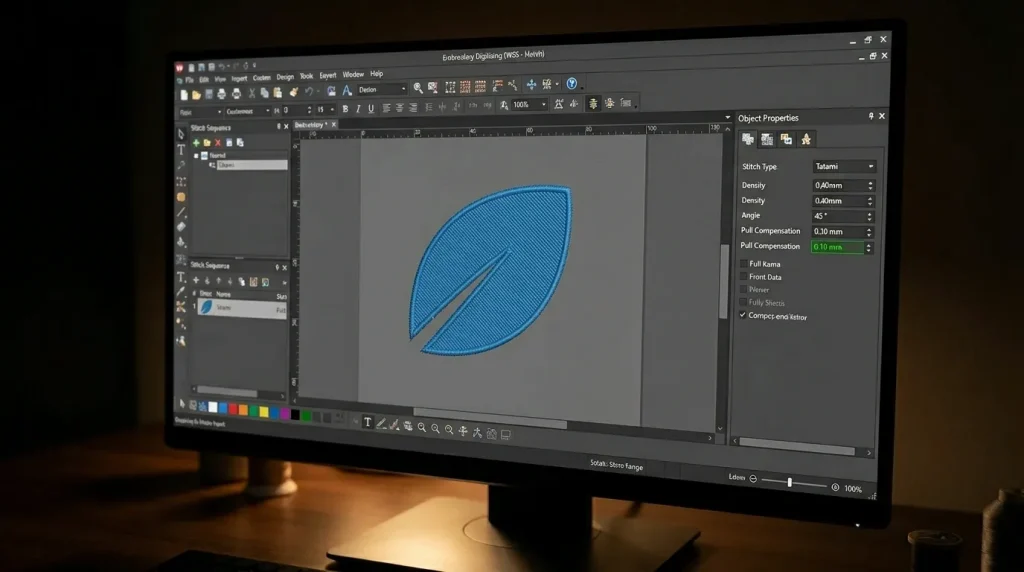
Stitch Angle Fix: Change the fill stitch angle to 45 degrees if it is currently set to 0 or 90 degrees relative to the border. A diagonal angle stops fill rows from driving directly into the border edge. They approach at an angle and stop naturally at the boundary without overflowing.
Satin Border Last: In your sequence panel, move the border outline object to the final position after all fill stitches have completed. Set the border as a satin stitch at 0.8mm to 1.2mm column width. This satin border stitches over the fill edge and creates a clean defined boundary that covers any remaining fill irregularities.
This outline-last technique is the same fix used when changing lettering from satin to fill stitch. A thin satin outline stitched after the fill always restores sharp edge definition.
Also verify your underlay is correctly set. Missing or inadequate underlay causes fill stitches to sink into the fabric instead of sitting on the surface and when fabric displaces, sunken stitches spread outward and leak. Full underlay guidance is in our guide on why embroidery sinks and how underlay fixes it.
When the Problem Keeps Coming Back
If fill stitch leaking continues once you correct pull compensation, move directly to the stitch angle and border sequence. Designs with very thin borders leave almost no room for tolerance. This creates compounding overflow that no single setting adjustment can fully fix on its own. A 0.5mm border outline cannot contain fill stitches effectively because the physical margin is too small.
The solution in these cases is to increase the border width to at least 0.8mm, or to slightly shrink the fill area inward from the border by 0.3mm using the inset tool in your digitizing software. This creates a buffer zone between the fill edge and the border outline giving pull compensation and stitch movement room to operate without reaching the boundary.
This is closely connected to the artwork preparation principles in how to prepare artwork for embroidery digitizing the right way clean artwork with adequate border widths prevents most fill containment problems before digitizing even begins.
Professional Digitizing vs. DIY Fixes

Fill stitch leaking is entirely preventable when a design is digitized correctly from the start. Professional digitizers set pull compensation based on the specific fabric type. They assign stitch angles deliberately to avoid border-facing rows. The border outline always goes last in their sequence.
Auto-digitizing tools apply these settings generically using the same pull compensation for every fabric, the same stitch angle regardless of border direction, and frequently the wrong sew sequence entirely. Fill stitch leaking shows up on the very first production run and forces you to correct the file manually before anything produces cleanly.
At Sassy Digitizing, every file is hand-built in Wilcom with fabric-specific settings assigned to every element. Our quality control team checks fill containment, pull compensation, stitch angle, and sew order on every single file before delivery. This is exactly why manual digitizing consistently outperforms AI auto-digitizing. Check our digitizing services and pricing to get your design fixed correctly.
Summary
Stopping fill stitches from leaking outside the outline requires three fixes applied in order:
- Fix 1: Reduce pull compensation to the correct value for your fabric type
- Fix 2: Rotate fill stitch angle to 45 degrees so rows do not drive directly into the border
- Fix 3: Move the border outline to the last position in the sew sequence and set it as a satin stitch
If leaking continues, increase the border outline width to at least 0.8mm or inset the fill area 0.3mm from the border to create a buffer zone.
For professionally digitized files where fill containment is set correctly from the first run, Sassy Digitizing handles every setting manually. Visit our digitizing services page to get started.
FAQs
1. Why are my embroidery fill stitches going outside the border? The most common cause is pull compensation set too high for the fabric, causing fill stitches to be physically wider than the design boundary. Secondary causes are fill angle pointing into the border and the border outline stitching before the fill instead of after.
2. Will adjusting machine tension fix fill stitch overflow? No. Fill stitch leaking is a digitizing file problem, not a machine problem. Machine tension adjustment will not change how wide the fill stitches are that is controlled entirely by pull compensation in the digitizing software.
3. Does sew order affect fill stitch containment? Yes. If the border outline stitches before the fill, the fill lands outside the border with nothing to stop it. Always sequence fill stitches before the border outline the border goes last.
4. What stitch angle stops fill stitches from leaking? A 45-degree fill stitch angle prevents rows from driving directly into any border edge. For circular designs, a radial angle works best. Avoid 0-degree and 90-degree angles when the border runs horizontally or vertically.
About the Author
Keith Blair | Senior Quality Control (HOD) Keith Blair serves as the Head of Department for Quality Control at Sassy Digitizing, bringing 12 years of commercial embroidery experience to the team. He specializes in stitch density, underlay construction, and pull and push compensation adjustments across all fabric types ensuring every digitized file is production-ready before it reaches the customer.


