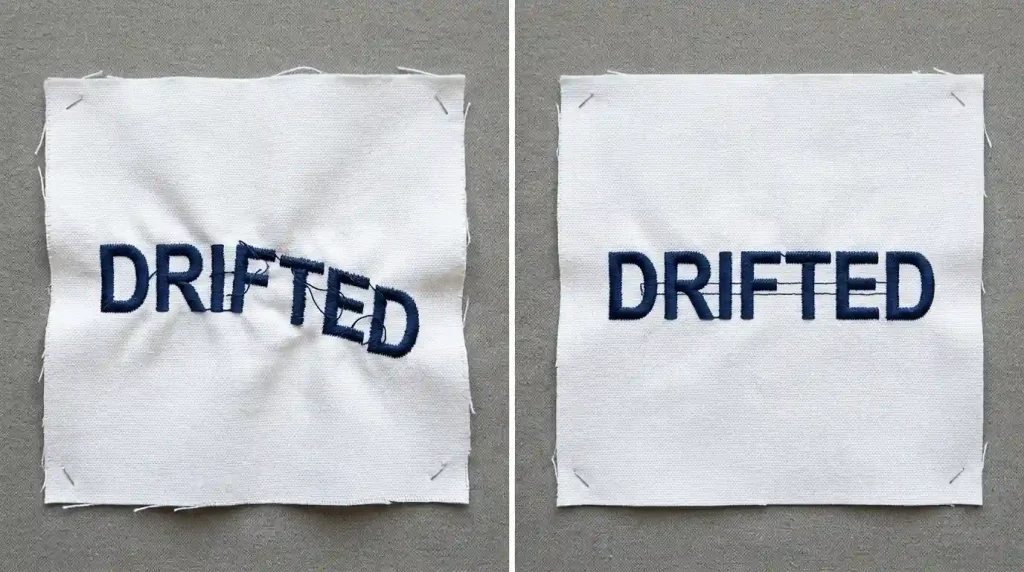
When embroidery letters don’t align, the finished text looks like a printing error. The fill sits in one position. The outline sits somewhere else. Some letters lean left while others lean right. The word looks broken and unprofessional even though every individual stitch ran correctly.
This problem frustrates customers more than almost any other embroidery issue because the design looked perfect in the preview and the machine ran without errors. The misalignment appears only after the garment comes off the machine.
Understanding why embroidery letters don’t align and how to fix it means looking at four specific areas: the digitizing file, the hooping, the stabilizer, and the thread tension. Every alignment problem traces to one or more of these four areas and fixing them in order solves the problem permanently.
Why Embroidery Letters Lose Alignment During Stitching
Letters misalign during stitching because thread pull moves the fabric between the time the fill stitches land and the time the outline stitches land. The fill stitches go down first. Each stitch pulls the fabric slightly inward. By the time the outline stitches run, the fabric has shifted and the outline lands in a different position than the digitizing file intended.
This is the core mechanism behind every letter alignment problem. Everything else wrong stabilizer, loose hooping, high tension either causes or amplifies this fabric movement.
The Main Causes of Embroidery Letter Misalignment
Cause 1: No Pull Compensation in the Digitizing File
Pull compensation is the setting that widens each stitch column in the digitizing file to account for the narrowing that happens when thread is pulled through fabric. Without it, the fill stitches land correctly but pull the fabric inward. Then the outline stitches land on shifted fabric and the two elements appear offset.
Cause 2: Wrong or Missing Underlay
Underlay stitches lock the fabric in position before the fill and outline stitches run. Without underlay, the fill stitches have no foundation to push against. The fabric moves freely with every needle hit and alignment breaks down progressively as the design builds up.
Cause 3: Loose Hooping
If the fabric moves inside the hoop during stitching, every element that stitches after the first will land in a slightly shifted position. Loose hooping is the fastest way to break letter alignment and it is also the easiest fix.
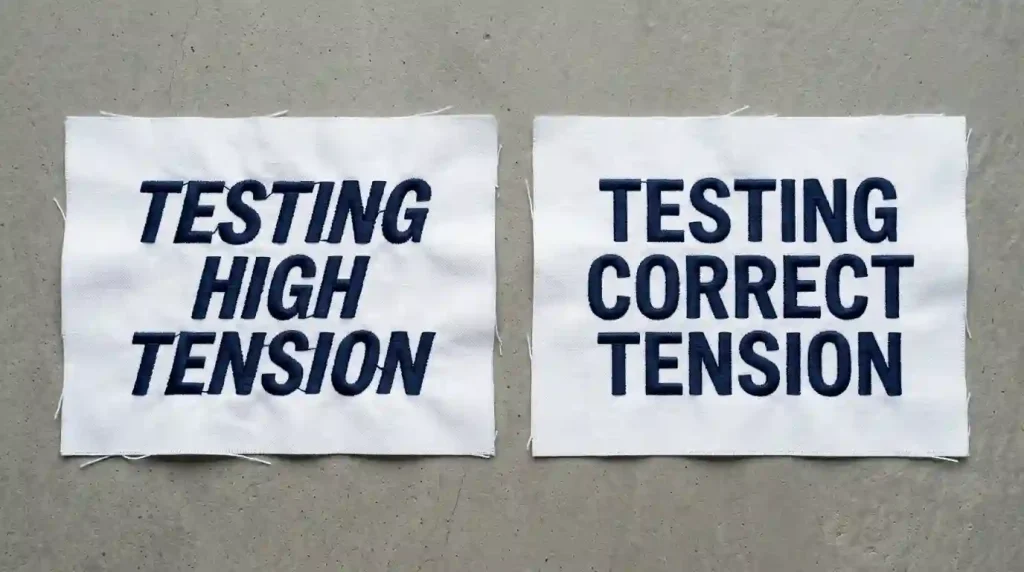
Cause 4: Thread Tension Too High
High upper tension pulls the thread tight on every stitch. This drags the needle fabric sideways as it exits the material. Letters stitch with a consistent lean in the direction of the tension pull and the outline lands offset from the fill on every letter.
Step-by-Step: How to Fix Embroidery Letter Alignment
Step 1: Set Pull Compensation Correctly in the File
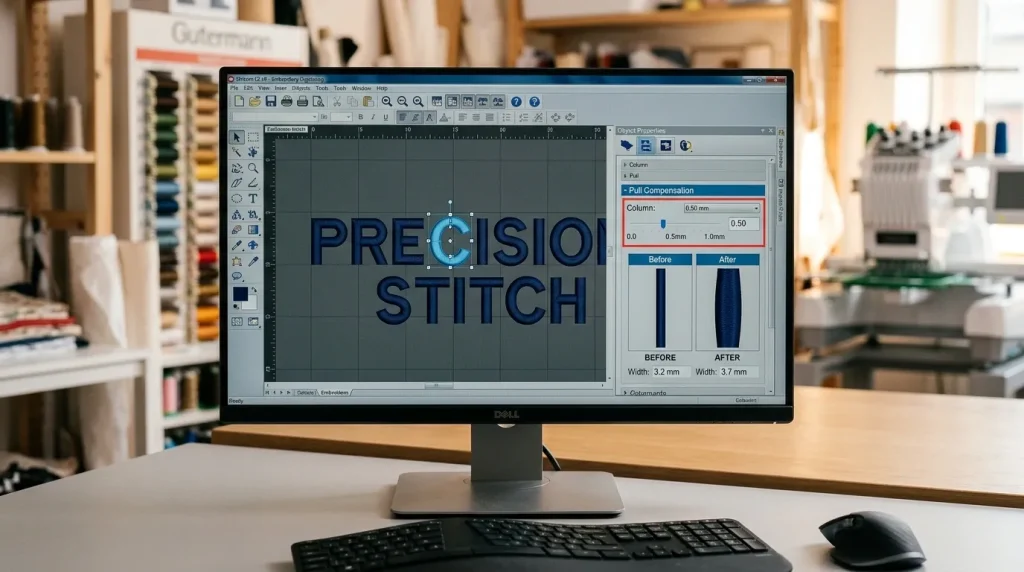
Open your digitizing file and check pull compensation on every text element. Apply these values:
Standard woven fabrics cotton and polyester: Set pull compensation to 0.4mm to 0.6mm. This compensates for the moderate thread pull on stable woven fabric.
Stretch fabrics and knits: Set pull compensation to 0.8mm to 1.2mm. Stretch fabric moves more under thread pull more compensation is needed to keep fill and outline aligned.
Pique polo fabric: Set pull compensation to 0.5mm to 0.7mm. The textured weave resists the needle differently from smooth fabric.
Structured caps: Set pull compensation to 0.6mm to 1.0mm. Cap frame resistance amplifies thread pull compared to flat hooping.
Check fill and outline separately. Both elements must have the same pull compensation value. If the fill is set to 0.5mm but the outline is set to zero, the two elements will always land in different positions after stitching regardless of every other setting in the file.
For more detail on pull compensation and column alignment, see our full guide on fixing misalignment and uneven columns in embroidery.
Step 2: Add Correct Underlay to Every Letter Element
Underlay prevents the progressive fabric drift that causes later letters to be more misaligned than earlier ones. Add correct underlay to every text element:
Satin stitch text at 4mm to 12mm: Use a single center-run underlay. This stabilizes the fabric along the stitch path before the satin columns run. The fabric stays locked in position from the first letter to the last.
Fill stitch text above 12mm: Use a double-zigzag underlay covering the full letter body. The zigzag pattern locks the fabric across the entire letter area not just along one center path.
On stretch fabrics: Add an additional edge-walk underlay tracing the outer boundary of each letter. This creates a physical border that prevents the fabric from moving outward as the fill stitches push inward.
For a full explanation of underlay types and their effect on embroidery quality, see our guide on why your embroidery is sinking.
Step 3: Re-Hoop the Fabric Drum-Tight
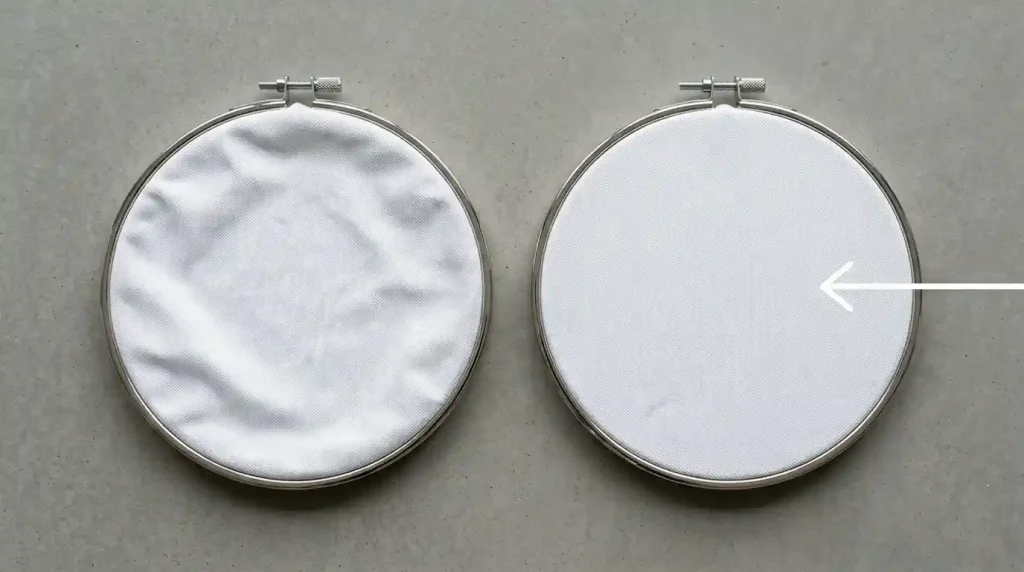
Remove the fabric from the hoop and start fresh. Follow this process every time:
Pull the fabric taut in all four directions before tightening the hoop screw. Do not tighten the screw first and then pull this approach never achieves drum-tight tension.
Press the center of the hooped fabric lightly. It should not give at all. If you feel any movement, the hooping is too loose.
Tug each edge of the fabric after hooping. If the fabric shifts position inside the hoop, remove and re-hoop tighter. This test takes ten seconds and prevents misalignment across the entire production run.
For caps: Center the cap precisely on the cap frame driver. Measure from the center seam to both sides of the frame both measurements must be equal. Even 2mm of rotation causes consistent letter lean across the entire design. For cap-specific alignment guidance, see our article on fixing outline and alignment issues on hat embroidery.
Step 4: Balance Thread Tension for Even Letter Alignment
If every letter leans consistently in the same direction, thread tension is pulling the fabric during stitching. Fix tension in this order:
Test on matching scrap fabric first. Never adjust tension during a production run. Stop, test on scrap, adjust, retest, then resume.
Reduce upper tension by one step. Stitch a test column and check the back. The bobbin thread should be just barely visible at the column edges on the back. If the bobbin thread is pulling to the top surface, upper tension is still too high.
Check the needle. A slightly bent needle causes the thread to pull sideways on exit creating letter lean that looks exactly like a tension problem. Replace the needle before adjusting tension settings if you have not already done so.
Check the bobbin case. A bobbin case with debris or lint buildup creates uneven bobbin tension that varies stitch by stitch causing random letter lean rather than consistent directional lean. Clean the bobbin case before every production run.
Step 5: Run a Full Test Stitch-Out and Check Alignment
After adjusting the file and setup, stitch a complete test on the exact same fabric and stabilizer you will use for the production run. Then check these points before approving:
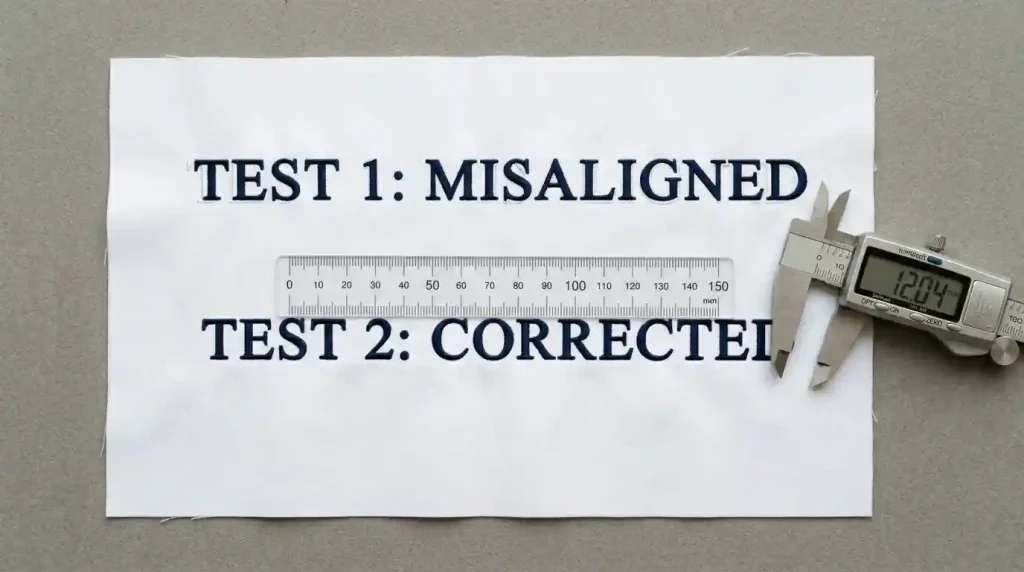
Check fill-to-outline alignment. Hold the test piece up close and look at one letter at a time. The outline should sit exactly on the outer edge of the fill no gap, no overlap, no visible offset.
Check letter vertical alignment. Every letter in the word should stand upright at the same angle. If any letter leans differently from adjacent letters, re-examine tension and hooping before the next test.
Photograph the test and zoom in. Alignment problems that look acceptable at normal viewing distance become clearly visible when you photograph the test and zoom to 200% on your phone screen. This is the fastest way to catch small remaining alignment issues before they appear across a full production run.
Measure the stitched text width and compare to the designed width in your file. If the stitched width is more than 0.5mm smaller than designed, increase pull compensation and run another test before production.
When Alignment Problems Come From the File
Working through every step above fixes alignment problems that come from the physical setup hooping, tension, and stabilizer. In some cases, however, alignment problems persist because the digitizing file itself was built incorrectly.
A file with no pull compensation, wrong underlay sequencing, or incorrect stitch angles will produce misaligned letters on every garment regardless of how well the machine is set up. In these cases, the file needs to be corrected or rebuilt before any physical adjustments will help.
At Sassy Digitizing, every lettering file is manually built with correct pull compensation, proper underlay on every element, and verified stitch sequencing. This eliminates the most common sources of letter misalignment before the file reaches your machine. Visit our digitizing services or contact us for a free quote.
Quick Fix Checklist
- ✅ Pull compensation set for every text element (fill and outline separately)
- ✅ Pull compensation value matched to specific fabric type
- ✅ Correct underlay assigned to every text element
- ✅ Fabric hooped drum-tight no give when pressed at center
- ✅ Fabric does not shift when tugged from edges
- ✅ Thread tension tested on scrap fabric before production
- ✅ Needle replaced before production run
- ✅ Bobbin case cleaned before production run
- ✅ Full test stitch-out run and inspected front and back
- ✅ Test photographed and zoomed to check alignment before approval
Summary
Embroidery letters don’t align because thread pull moves the fabric between stitch elements and the fix starts in the digitizing file with correct pull compensation and underlay, then continues with drum-tight hooping and balanced thread tension. Work through these five steps in order and letter alignment problems disappear permanently.
For files where alignment problems persist after every physical adjustment, the digitizing file needs to be corrected. Sassy Digitizing builds every lettering file with correct alignment settings from the start so your text stitches straight and sharp on the first production run.


