
The sew order of a cap logo the sequence in which each element stitches out on the machine is one of the most overlooked settings in embroidery digitizing. Most beginners focus on stitch type, density, and pull compensation. But even a perfectly digitized logo will distort, pucker, and misalign on a cap if the sew order pushes fabric in the wrong direction during production.
This guide explains exactly why bottom-up and center-out are the correct sew directions for cap logos and how to set them up in your digitizing file.
Why Sew Order Matters on Caps
Cap fabric is fixed inside a cap frame that holds the front panel taut. As the machine stitches, each stitch pushes a tiny amount of fabric in the direction the stitch travels. On flat garments like polo shirts or jackets, this fabric push is minimal and spreads evenly across a large surface.
On a cap, however, the fabric is constrained inside a small rigid frame. As a result, there is nowhere for the pushed fabric to go except to pile up at the nearest edge usually the brim. Consequently, when this happens the logo distorts, puckers at the bottom, and loses alignment.
This fabric push problem is also one of the core causes of why hat embroidery keeps pinching in the same spot the sew order is directing fabric push toward a fixed edge with no release point.
The solution is to control the direction of that push deliberately either away from the brim by sewing bottom-up, or away from the center by sewing center-out.
Step 1: What Is Bottom-Up Sew Order?

Bottom-up sew order means the logo begins stitching at the element closest to the brim and progresses upward toward the crown.
This works because each stitch pushes fabric upward toward the crown the most flexible and forgiving part of the cap structure. The crown can absorb excess fabric naturally because it curves away from the frame. The brim edge, by contrast, is rigid and fixed any fabric pushed toward it has nowhere to go and creates puckering.
Use bottom-up sew order when:
- The logo is taller than it is wide
- The design has strong horizontal elements like text sitting near the brim
- The logo contains multiple stacked rows of elements from bottom to top
For tall logos with stacked text and graphic elements, bottom-up sew order combined with correct cap embroidery digitizing settings gives the cleanest and most stable production result.
Step 2: What Is Center-Out Sew Order?
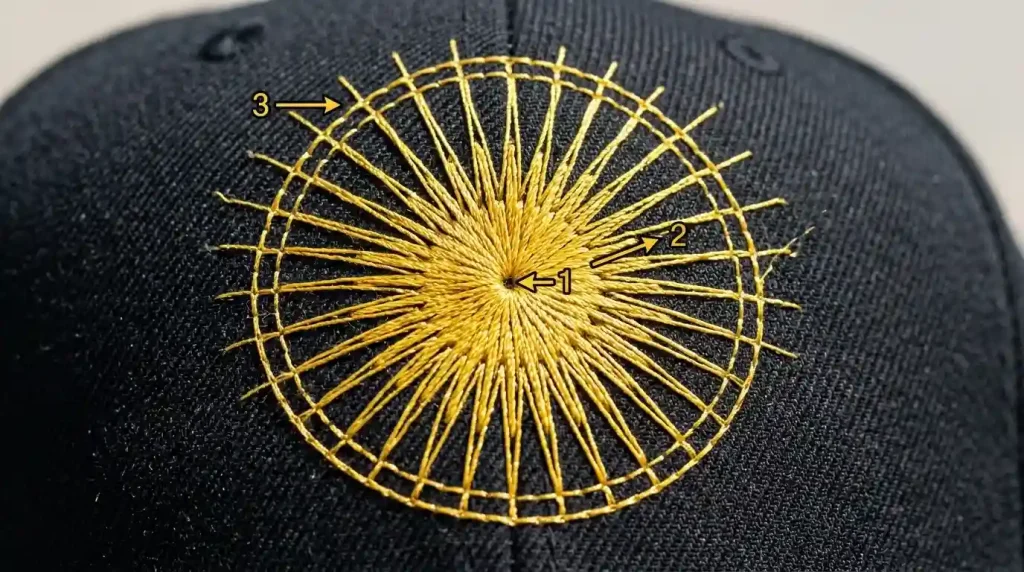
Center-out sew order means the logo begins stitching at the center element and progresses outward to the edges in all directions equally.
This works because fabric push is distributed evenly outward from the center no single edge collects excess fabric because the push is balanced on all sides. For circular logos, badge-style designs, and symmetrical crests, center-out sew order keeps the design perfectly registered from start to finish.
Use center-out sew order when:
- The logo is circular, oval, or badge-shaped
- The design is as wide as it is tall
- The logo has a central focal element surrounded by border rings or text
Center-out is also the correct approach when fixing fill stitches that overflow the border outline on circular or symmetrical cap logos the outward push keeps fill stitches moving away from the center rather than compressing against the outer border.
Step 3: How to Set Sew Order in Your Digitizing Software
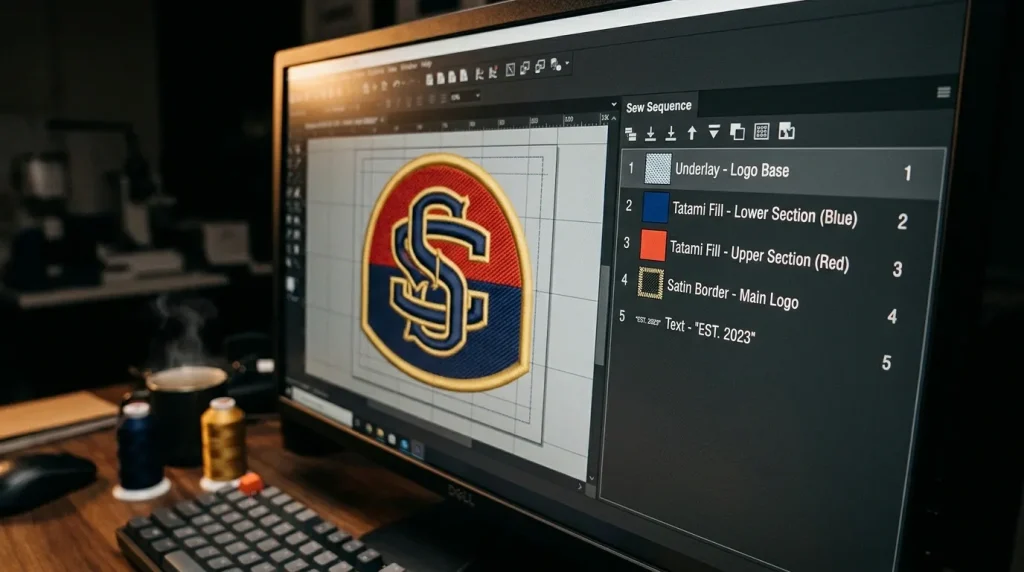
In professional embroidery digitizing software like Wilcom, sew order is controlled through the sequence panel a numbered list of every stitch object in your design.
For bottom-up sew order:
- Position 1: Underlay stitches for the lowest element
- Position 2: Fill or satin for the lowest element
- Continue numbering upward through each element
- Final position: Top border outline or uppermost element
For center-out sew order:
- Position 1: Underlay for the center element
- Position 2: Fill or satin for the center element
- Position 3 onward: Each surrounding ring or layer moving outward
- Final position: Outermost border outline
One additional rule for both sew orders always stitch the underlay for each element immediately before the top stitches for that same element. Never stitch all underlays first and all top stitches second. Keeping underlay and top stitches paired together in sequence prevents the fabric from shifting between the two layers. This is the same underlay sequencing principle covered in our guide on why embroidery sinks without correct underlay.
Bottom-Up vs Center-Out: Which One to Choose
Both sew orders solve the fabric push problem they just solve it in different ways for different logo shapes.
Tall vertical logos with stacked text work best with bottom-up sew order. Circular, badge, and symmetrical logos should always use center-out. When a logo is wide and horizontal with no clear vertical structure, center-out starting from the most central element is the safer choice.
When in doubt, center-out is the safer default for most cap logo shapes because it distributes fabric push in all directions equally rather than concentrating it toward the crown.
Auto-digitizing tools almost never set sew order correctly for cap logos this is one of the key reasons manual digitizing outperforms AI auto-digitizing on real cap production runs. An experienced digitizer reads the logo shape and assigns the correct sew sequence deliberately the algorithm assigns it randomly based on the order elements were drawn.
Professional Cap Logo Digitizing

Setting correct sew order requires professional digitizing software and an understanding of how cap fabric behaves under the needle. If your cap logo file was created in basic machine software or auto-digitized, sew order is almost certainly not set correctly and no machine adjustment will fix a problem that lives in the file sequence.
At Sassy Digitizing, every cap logo is digitized manually in Wilcom with deliberate sew order assignment based on the logo shape and cap fabric type. Check our digitizing services and pricing to get your cap logo production-ready with correct sequencing from the first run.
Summary
Sew order is a critical digitizing setting for cap logos that directly controls whether fabric push distorts the design or releases cleanly.
- Bottom-up: Start at the brim, finish at the crown best for tall vertical logos
- Center-out: Start at the center, finish at the outer edges best for circular and badge logos
- Always pair underlay and top stitches together in sequence for each element
- Set sew order inside professional digitizing software never rely on auto-digitizing or machine software defaults
For professionally sequenced cap logo files, Sassy Digitizing handles every detail manually for clean distortion-free production results.
FAQs
1. What is sew order in embroidery digitizing? Sew order is the sequence in which each stitch object in a design stitches out on the machine. Correct sew order controls fabric push direction and prevents distortion on constrained surfaces like cap panels.
2. Why does sew order matter more on caps than flat garments? Cap fabric is held in a rigid frame with limited room for fabric to shift. Incorrect sew order concentrates fabric push at fixed edges like the brim, causing puckering and distortion that flat garment embroidery absorbs naturally.
3. Can I change sew order in my embroidery machine software? Most machine loading software does not offer full sew order control. Professional digitizing software like Wilcom is required to set and adjust the complete stitch sequence.
4. What happens if I use top-down sew order on a cap logo? Top-down sew order pushes fabric toward the brim the most rigid fixed edge of the cap frame. This causes puckering at the bottom of the logo and misalignment that worsens as the design grows larger.
About the Author
Keith Blair | Senior Quality Control (HOD) Keith Blair serves as the Head of Department for Quality Control at Sassy Digitizing, bringing 12 years of commercial embroidery experience to the team. He specializes in stitch density, underlay construction, and pull and push compensation adjustments across all fabric types ensuring every digitized file is production-ready before it reaches the customer.


