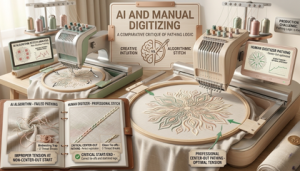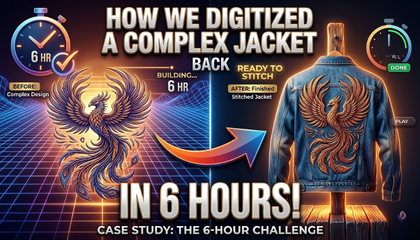
The Challenge: When Art Meets Industrial Reality
In the embroidery world, a “Jacket Back” is considered the ultimate test of a digitizer’s skill. Unlike a small left-chest logo, a jacket back usually covers an area of 10 to 15 inches and can contain anywhere from 50,000 to over 100,000 stitches. Recently, a client approached us with a design that most firms would turn away—a highly detailed, multi-layered artwork with intricate gradients, small text, and overlapping elements. The deadline? They needed it production-ready in less than a day. Many people ask how we managed to deliver such a complex jacket back embroidery digitizing project in just 6 hours without compromising quality. The answer lies in our structured workflow and years of technical expertise.
Phase 1: Analyzing the “Push and Pull” Physics (Hour 1)
Before a single stitch is placed, our team spends the first hour analyzing the artwork. A common mistake made by even a top 10 embroidery digitizing company is rushing straight into the software. Large designs exert a massive amount of “Pull” on the fabric. If you don’t calculate the fabric’s reaction, the design will shift, and the outlines will never meet the fills. We analyzed the client’s specific fabric—a heavy denim—and planned our “Pathing Strategy” to ensure the design would stitch from the center outward to minimize displacement.
Phase 2: Building the Foundation (Hour 2-3)
The secret to a flawless jacket back is the underlay. For this project, we couldn’t use a standard “one-size-fits-all” underlay. We manually digitized a multi-layered foundation that included “Grid” underlays for large fill areas and “Edge Walk” underlays for the detailed satin borders. This ensures the design stays flat and doesn’t become a “bullet-proof” stiff patch. At Sassy Digitizing, we prioritize the “Hand” or feel of the garment. By engineering the underlay correctly, we can use fewer top stitches, making the jacket comfortable to wear while maintaining full color coverage.
Phase 3: The Art of Manual Pathing (Hour 4-5)
While AI software tries to auto-trace designs, it fails miserably with complex gradients and small details. During these two hours, our master digitizers hand-punched every single element. We focused on “Smart Pathing”—a technique that reduces jump stitches and unnecessary thread trims. For a design this large, every trim adds seconds to the production time. By optimizing the pathing, we saved the client nearly 20 minutes of machine run-time per jacket. This level of professional digitizing is what separates a premium service from a budget freelancer.
Phase 4: Quality Assurance and Final Polish (Hour 6)
The final hour is dedicated to our rigorous Quality Assurance (QA) process. Led by our HOD, Keith Blair, the file is reviewed for density balance and format compatibility. We look for potential “hot spots” where too many stitches might cause needle breaks. We also ensured that the color changes were logical, so the machine operator wouldn’t have to constantly swap threads. In exactly 6 hours, the file was sent to the client—not just as a digital image, but as a high-performance blueprint for their embroidery machine.
Why Sassy Digitizing is a Leader in 2026
Delivering a high-stitch-count project in such a short window is why we are consistently recognized as a top 10 embroidery digitizing company globally. We don’t believe in shortcuts. Whether it is a simple logo or a massive jacket back, our commitment to “Manual Precision” remains the same. We understand that in the US market, quality and speed must go hand-in-hand. This is why we are the preferred partner for large-scale production houses and boutique shops alike.
To prove our capability, we offer your first trial for free. You don’t have to take our word for it; you can experience our quality on your own machines. Send us your most challenging artwork, and let us show you how we can transform it into a machine-ready masterpiece. With Sassy Digitizing, you get 24/7 support, industry-leading turnaround times, and the peace of mind that comes with expert quality assurance.
Frequently Asked Questions (FAQs)
1. Is 6 hours a standard turnaround for jacket backs?
Typically, large designs take 12 to 24 hours. However, for urgent projects, our “Super-Rush” team can deliver complex files in 6 hours using our specialized internal workflow.
2. How do you prevent a large design from becoming too stiff?
We use “Stitch Logic” to manage density. Instead of just adding more stitches, we use smart underlays and adjusted stitch angles to create full coverage with less thread weight.
3. What makes Sassy Digitizing one of the top 10 embroidery digitizing companies?
Our focus on manual precision, 2-hour rush options for logos, and a dedicated US-based support system are the key factors that put us at the top of the industry.
4. Can I get a free trial for a large jacket back design?
Our “First Trial Free” offer is generally for logos under 5 inches. However, for large-scale projects, we provide competitive pricing and a small “Test Sample” to show you our quality before you commit.
About the Author
Keith Blair | Senior Quality Control (HOD) Keith has over 12 years of experience managing large-scale embroidery production. He specializes in the mechanical relationship between thread, needle, and fabric. Now leading the QC team at Sassy Digitizing, Keith’s mission is to help embroiderers eliminate downtime by providing flawlessly digitized files.