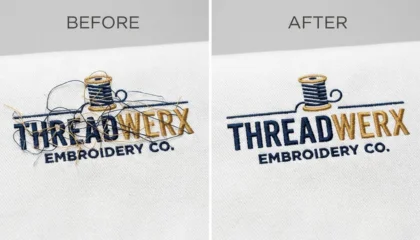
You just pulled your garment off the embroidery machine, excited to see the final result. But instead of a clean, crisp logo, you’re looking at a mess of stray threads criss-crossing the design like loose wires. These are jump stitches and they’re one of the most frustrating problems in embroidery production.
The good news? Every single jump stitch has a specific cause, and every cause has a specific fix. Whether the problem is in your digitizing file or your machine settings, this guide walks you through everything.
What Is a Jump Stitch?
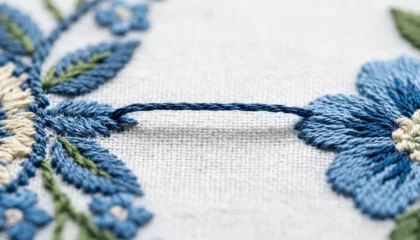
A jump stitch is what happens when the embroidery machine moves the needle from one part of a design to another without cutting the thread in between. The thread drags across the surface of the fabric, leaving a long, loose strand floating over your embroidery.
On a well-digitized file with proper trimming commands, these thread travels are cut automatically and stay invisible. When they aren’t that’s when you get the ugly surprise.
Important: A few jump stitches trimmed neatly are normal. Dozens of them scattered everywhere? That’s a digitizing or machine settings problem you need to fix before running another piece.
Cause 1: Poor Digitizing

This is the number one reason for excessive jump stitches. If the person who created your embroidery digitizing file didn’t plan the stitch path efficiently, the needle ends up jumping between disconnected areas constantly.
What bad digitizing looks like:
- The machine crosses the entire design to stitch a small, isolated element
- Trim commands are missing or misplaced
- Color stops are not logically sequenced
The fix: You need a professionally re-digitized file. At Sassy Digitizing, every file is manually built with optimized stitch paths that minimize travel and place trim commands exactly where they belong.
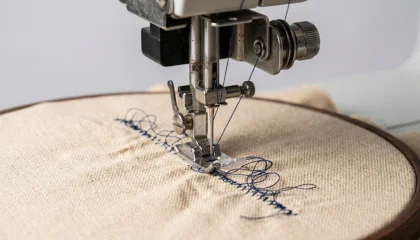
Cause 2: Missing Trim Commands in the File
This is closely related to digitizing quality, but worth calling out separately. Modern embroidery machines can automatically cut the thread when they receive a trim command embedded in the file.
If your digitizer forgot to add trim commands or used software that doesn’t support them properly the machine keeps the thread intact during every needle travel.
The fix: Open the file in your embroidery software and manually check that trim commands exist at each major color change and design section. If you’re unsure how to read the file, send it to our team for a review.
Cause 3: Wrong Thread Tension
Even a perfectly digitized file can produce jump stitch problems if your machine tension is off. When the upper thread tension is too loose, the thread doesn’t pull cleanly through the fabric and may leave slack between stitch points.
Signs your tension is the problem:
- Jump stitches appear only on certain fabrics, not all
- The thread looks looped or puckered at the back
- The problem started after a needle or thread change
The fix: Re-thread the machine completely and re-test tension on a scrap piece of fabric. For cap embroidery and towel embroidery, tension settings need to be adjusted specifically for those fabric types.
Cause 4: Dull or Wrong Needle
A dull needle drags through fabric instead of piercing it cleanly. This creates resistance that can cause the thread to skip or float instead of anchoring properly.
The fix: Change your needle after every 8–10 hours of embroidery run time. For thick fabrics like denim or canvas, use the correct needle size a needle that’s too fine will struggle and skip.
How to Fix Jump Stitches Step by Step
Step 1: Identify the Source
Before touching scissors, determine if the jumps are scattered randomly (machine/tension problem) or following a logical path across the design (digitizing problem). This tells you where to focus your fix.
Step 2: Manual Trimming
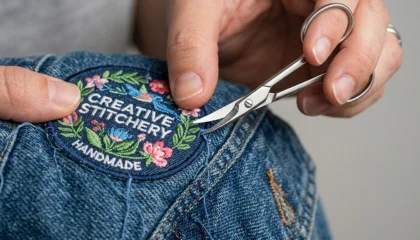
For a finished piece that already has jump stitches, careful manual trimming is your only option.
- Use small, sharp embroidery scissors not fabric shears
- Slide one blade under the jump thread and clip it close to the entry and exit points
- Do not pull the thread out always cut both ends and remove the middle section
- Use a lint roller or soft brush to remove all thread debris
Pro Tip: Trim from the back of the garment first to see where the thread anchors, then cut from the front.
Step 3: Fix the Root Cause
Trimming fixes the symptom. To stop jump stitches from appearing on the next run, you must fix the actual cause:
- Digitizing issue → Get a properly digitized file from Sassy Digitizing
- Tension issue → Re-calibrate your machine tension and re-test
- Needle issue → Replace needle and test on scrap fabric first
DIY Fixes vs. Professional Re-Digitizing
If you’re getting jump stitches on every single run, the problem is almost certainly in the file itself not your machine. Here’s a simple way to know which path to take:
Try DIY fixes if: The jumps appear inconsistently, only on certain fabrics, or started after a machine adjustment.
Get the file re-digitized if: The jump stitches appear in the exact same spots every run, on every fabric and every machine.
Sassy Digitizing offers full digitizing services with manual file-building. Every file is tested for stitch path efficiency, proper trim placement, and clean output before it reaches you. Check our portfolio to see the quality standard.
Summary
Jump stitches in embroidery almost always come from one of four sources: poor digitizing, missing trim commands, incorrect thread tension, or a worn-out needle. Most production-level problems trace back to the digitizing file itself.
Clean embroidery starts with a clean file. If you’re dealing with repeated jump stitch problems and want a professional file built the right way, contact Sassy Digitizing we’ll sort it out.
About the Author
Keith Blair | Senior Quality Control (HOD) Keith Blair is the Head of Quality Control at Sassy Digitizing with 12 years of commercial embroidery experience. He specializes in stitch density optimization, 3D puff digitizing, and production file testing to ensure every file runs cleanly on the first attempt.


