If you want to fix puckering in embroidery, two digitizing settings solve it faster than anything else: a proper full underlay and the correct bottom-to-top stitch direction. This guide shows you exactly how to apply both.
Puckering happens when stitches drag loose fabric inward with no foundation to hold it. The result is a wrinkled, unprofessional finish around your design and it is almost always a file problem, not a machine problem.
Why You Get Puckering in Embroidery
Two things cause most puckering cases in embroidery production:
- No underlay or wrong underlay top stitches grab bare fabric threads and pull them inward
- Top-to-bottom stitch direction needle pushes fabric ahead of it, building tension that buckles at the edges
Both issues live inside the embroidery digitizing file. Adjusting your machine settings will not fix them.
Step 1: Add a Full Underlay to Fix Puckering in Embroidery
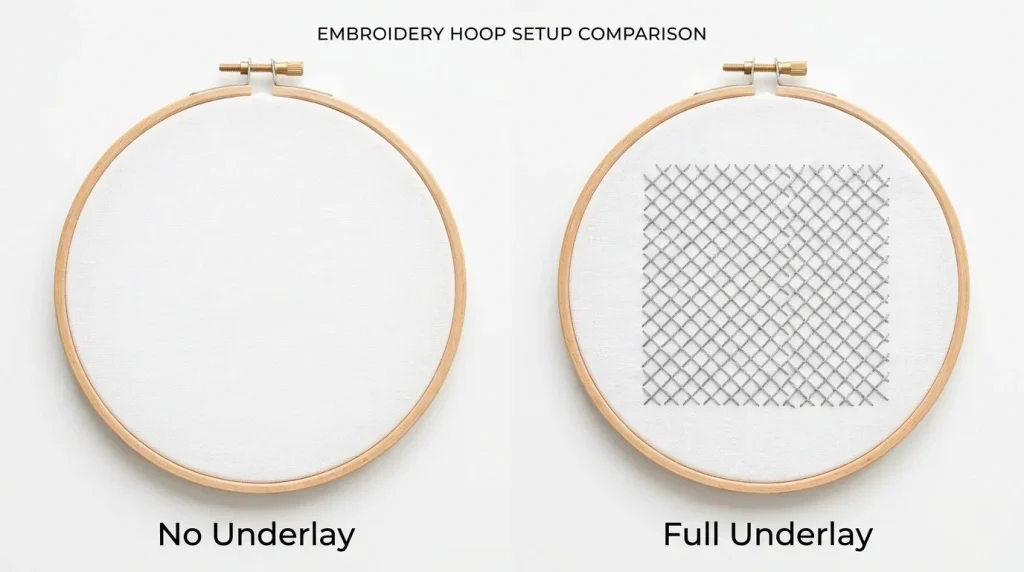
A full underlay is a base layer of stitches placed before your main fill or satin stitches run. It locks the fabric in place, so top stitches have a stable surface to sit on not raw fabric threads to pull.
Without underlay: Top stitches drag loose fabric, causing puckering at the edges.
With full underlay: Fabric is anchored. Stitches lay flat. Puckering stops.
Choose the right underlay type:
- Edge Walk for satin columns and borders
- Zigzag Underlay for fill areas on standard fabrics
- Grid/Full Coverage for dense logos on knit or stretch garments
Pro Tip: For left-chest logos on polo shirts or t-shirts, start with a zigzag underlay at 4mm spacing. This alone fixes puckering in most standard embroidery cases.
Step 2: Switch to Bottom-to-Top Stitching Direction
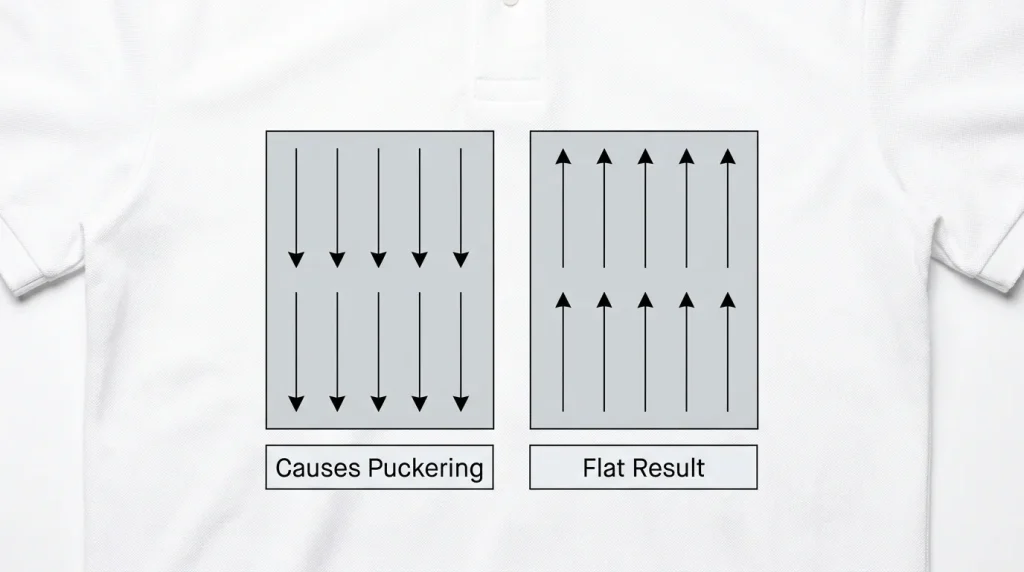
Stitch direction controls how fill stitches travel across a shape. Most software defaults to top-to-bottom and this is one of the leading causes of puckering on large fill areas.
Why top-to-bottom causes puckering: The needle pushes fabric downward with every pass. Over a wide fill area, this builds pressure that has nowhere to release it buckles into puckering at the bottom edge.
Why bottom-to-top fixes puckering in embroidery: Stitching upward works with the natural grain of woven and knit fabrics. Fabric tension releases at the top of the hoop instead of compressing at the bottom.
How to change it in Wilcom: Select your fill element → Stitch Properties → Set angle to 90° (bottom-to-top). Test on scrap fabric before running on garment.
Step 3: Test and Confirm the Fix
Apply both fixes together, then test:
- Add correct underlay type for your fabric
- Set stitch direction to bottom-to-top (90°)
- Run a test stitch on scrap fabric of the same type
- Check that all edges lie flat with no rippling around the design
If puckering still appears after both fixes, check your stabilizer weight and hoop tension as secondary causes.
When the File Needs Professional Re-Digitizing
Minor puckering can be corrected by adjusting underlay and stitch angle yourself. But if the distortion is severe or appears across the whole design, the file structure itself is wrong and needs to be rebuilt not just tweaked.
At Sassy Digitizing, every embroidery digitizing file is built with correct underlay structure and stitch direction from the start. If you are getting puckering from an existing file, our team will identify the root cause and fix it fast. You can also explore our custom patches service if you need production-ready patch designs with zero puckering.
Summary
To fix puckering in embroidery, add a full underlay to stabilize the fabric and switch your stitch direction to bottom-to-top. These two changes inside your digitizing file eliminate the root cause of most puckering cases. Always test on scrap fabric before running your final garment.
Frequently Asked Questions
How do I fix puckering in embroidery? Add a proper full underlay to your design and change the fill stitch direction to bottom-to-top (90°). These two digitizing changes fix the most common causes of fabric puckering.
Does stitch direction affect puckering? Yes. Bottom to top stitching releases fabric tension upward instead of compressing it downward, resulting in flat, clean embroidery with no bunching.
What underlay is best to prevent puckering? A zigzag underlay works for most standard fills. Use a full grid underlay for dense logos on soft or stretchy fabrics.
Can I fix puckering without changing the machine? Yes. Puckering is almost always a digitizing file problem fix the underlay and stitch direction inside the file, not on the machine.
About the Author
Keith Blair | Senior Quality Control (HOD) Keith Blair serves as Head of Department for Quality Control at Sassy Digitizing with 12 years of commercial embroidery experience. He specializes in underlay structure, stitch direction, and production ready file testing across all fabric types.